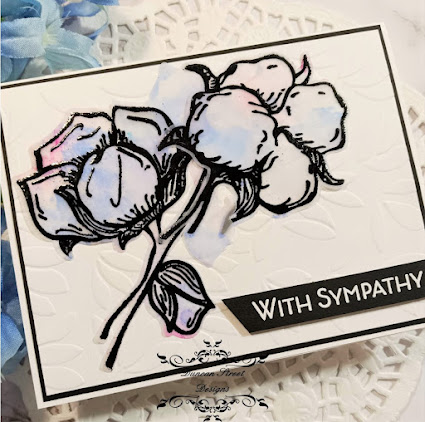
Hello Friends! Today I'm sharing a card created for the Altenew Academy Level 2 Course: Magical Markers Techniques. This course focuses on tips, tricks and techniques for using your Alcohol Markers in creative ways.
For my card, I've used the Altenew "Cotton Comfort" Stamp and Coordinating Die Bundle to create a Sympathy Card. I don't have a need for this type of card at the moment thank goodness, however I thought the Cotton Blooms lent themselves to a Sympathy card.
- To start my design, I wanted to create a card that had a soft color palette so using medium shades of pink and blue alcohol markers, I laid down color on vellum. There was no rhyme or reason to how I added the color; I just scribbled the color on using the markers' broad tip.
- Using an eye dropper, I applied 91% Isopropyl Alcohol to the vellum and moved the alcohol ink/isopropyl alcohol mixture around with a Rocket Air Blaster. The colored areas dried almost immediately due to the alcohol evaporating so quickly.
- Using a stamp positioner, I stamped the images directly onto the colored side of the vellum. TIP: Because I've stamped on Vellum and did not use a Solvent Ink such as Staz-On, I must heat emboss because the pigment ink will not dry on this non-porous surface.
- Using the coordinating dies, I cut the images and set aside to prepare the card panel and sentiment.
- The background was a little too plain for my liking so I embossed the panel with a leaf patterned folder.
- The sentiment; from the same stamp set, was stamped and heat embossed using fine detail white embossing powder. TIP: When embossing, remember to use your anti-static powder. When I heat emboss on black card, I add more anti-static powder than I think I need. This always ensures I get a crisp emboss.
- I arranged the cotton picks and once I was pleased with the layout, I picked it up with Press and Seal Plastic Wrap. This is my "go-to" method for picking up arrangements and guarantees I won't have to fuss with it again once I have it the way I want it.
- To adhere the vellum to the panel, I carefully applied liquid adhesive to the thick parts of the image outline. I purposely left some areas of the image without adhesive so there would be a bit of dimension. The sentiment strip was popped on craft foam.
This completes my class project and I'm pleased with the result. This was a fun class and I enjoyed the planning process. This particular technique was not shared in the course however the course provided the ideas and I provided the design.
Until next time, Happy Crafting!
Donna
**Challenges Entered:

