Hello Friends and thanks for visiting me. I'm back with another Altenew Academy post and today I'm sharing my homework submissions for the All About Layering 2 Course. Following suit with the Layering Lessons 1-3, Lesson 4 continues with stamp layering instruction using stamps with more layers to line up.
It's July and my projects feature a "Christmas in July" theme using non-traditional holiday colors and florals. 1st up is an A2 sized card created using the Altenew Amaryllis Stamp and Coordinating Die Set. For this card, I thought a 1950's Pastel Color Scheme would make a beautifully Retro Holiday card.
To start, I decided on a pink and turquoise blue color combo for the florals and started the stamping process with the outline stamp in black pigment ink, then proceeded through the layers with light to dark tones of blues and pinks. This Amaryllis has 8 layers, which may seem intimidating but trust me on this, it's not hard to line up the layers at all. Here's a Tip: If you aren't confident, or if like me, shaky handed at times, a stamp postitioning tool works wonders for flawless layer stamping. Pick a couple areas that line up, take your time, pick up the stamp with the positioner lid, ink up and stamp....Easy Peasy!
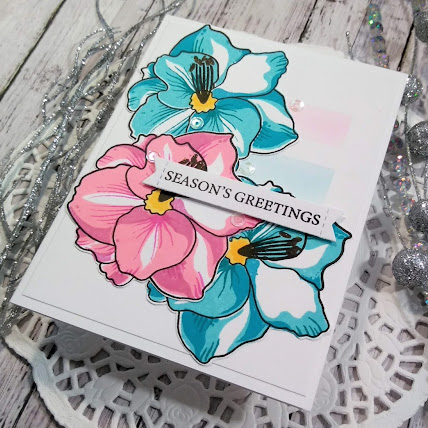
After inking up the florals and cutting with the coordinating dies, I did a "dry run" layout before picking with the Press and Seal plastic wrap. Setting that aside to work on the panel, I stenciled with the lightest of the Pink and Blue to create thick horizontal lines. I adhered the floral arrangement to the stenciled panel, adhered to a card base, stamped the sentiment and popped on foam pads for dimension.
My second submission is an A2 sized, Easel Card using Kraft and tones of Purples, Greens and Golds. Using the Altenew Majestic Bouquet Stamp and Coordinating Die Set, I followed the same procedure above to stamp through 6 layers for the florals and 2 layers for the leaves.
I chose Kraft card because I wanted to see how different the Purples and Greens would look on a darker background. This was an experiment gone Right..sometimes experiments go wrong but it's always fun trying! The purples are subdued and the greens are rich; if I had stamped on white, they would be very vibrant and bright.
I embossed a Matte Gold and Kraft card panel with a Vine design, arranged the florals, did my "dry run" layout, picked up with Press and Seal and adhered everything down flat. To create the card stop, I stamped and heat embossed the sentiment, die cut, then mounted on foam pads to give it the dimension needed to allow the card front to stand up.
I love creating Holiday cards with "non-traditional" florals and colors. It's fun to step out of the norm, do some experimenting and create something clever and unexpected. Thanks for stopping by and until next time, Happy Crafting!
Donna
Supplies Used:
Catherine Pooler Inks
Neenah Solar White Classic Crest 80 lb and 110 lb Cardstock
Recollections Kraft Cardstock
Recollections Gold Mirror and Matte Gold Cardstock
Darice Vines Embossing Folder
Season's Greetings Block Stamp from Hobby Lobby
Clear Sequins from Michael's
Mini Misti Stamp Positioner
Standard Misti Stamp Positioner
**Challenges Entered Amaryllis:
**Challenges Entered Majestic Bouquet:


