Showing posts with label Ink Blending. Show all posts

Saturday, January 15, 2022

Altenew Academy Level 2 Course: Color Your Day

Hello Everyone, I'm back to share another Altenew Academy course project.  Today's card was created for the Level 2 Course:  Color Your Day.  This 6 part course covered techniques and ideas on adding splashes of color to projects for visual interest and fun.

For my project, I've used the Altenew Fantasy Floral Stamp and Coordinating Die Bundle along with stenciling to create an interesting design.  My design was directly inspired by one of the projects the instructor, Therese Calvrid completed in the course.  


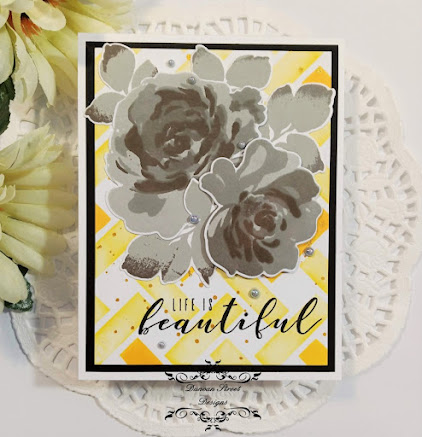
To begin my project, I considered a design for the background and the colors I wanted to use.  I decided upon a simple yet effective neutral focal with a bright background.  The floral set are layering stamps so using all 4 inks in the Altenew Gentlemen's Gray Crisp Dye Ink Mini Cube Set,  I stamped from light to dark, building up the colored layers.  I die cut the florals and leaves with the coordinating dies and set aside to prepare the background.

Using a light shade of yellow ink, I blending over the entire stencil then came back with a darker shade of yellow and blended in a few areas.  If you'll notice, I varied my pressure when blending the light yellow so I would get the look of using more than 2 inks; parts of the lighter color is even lighter within the area and that was due to the pressure I applied when blending.  Once I was happy with the stenciling, I splattered the panel with Gold Watercolor Paint and set aside to dry.


Once the panel was completely dry, I stamped the sentiment from the Altenew More Than Words Stamp Set.  In hindsight, I should have stamped the sentiment prior to splattering with the gold watercolor but as it happened, there were no splatters where the sentiment was stamped.  That was pure luck and next time, I will stamp the sentiment prior to splattering.

To complete the card, I adhered the stenciled panel to a black mat, arranged the florals and adhered to the panel flat using liquid adhesive; only popping the front floral on craft foam.  Gray Opal Pearl Embellishments from Kat Scrappiness were added for additional interest.

This was a fun course and I thoroughly enjoyed it.  It's fun to experiment with color in your designs; I wouldn't have thought to use florals in a neutral color but in doing so, the bright background made those florals Pop off the page, even if they are gray.

Thanks for stopping by, I appreciate your visit.  Until next time, Happy Crafting!

Donna

**Challenges Entered:

Wednesday, August 25, 2021

Thankful, Grateful and Blessed with Sunspot Background Die

Hello Crafty Friends.  Today, I'm on the Kat Scrappiness Blog with an Autumn themed card featuring ink blending, the Kat Scrappiness Sunspot Background Die, new Embellishment Spoon and Gold Mine Rhinestones.


To start, I blended an A2 sized panel of Kraft Card with Dusty Concord, Fired Brick and Fossilized Amber Distress Oxide Inks.  After allowing the inks to dry completely, I die cut the blended panel with the Kat Scrappiness Sunspot Cover Die and adhered to a Kraft Card base using liquid adhesive.

The cover die cuts a circle in the middle and I wanted to place a sentiment there and needed a larger area to stamp on, so I stamped and die cut a larger circle.  For dimension, I mounted the sentiment circle on craft foam and adhered to the card.


Lastly, I wanted sparkle and shine on my project so using the new embellishment spoon by Kat Scrappiness, I scooped some Gold Mine Rhinestones and adhered the medium sized gems around the sentiment circle.  

That completes my card for today. Below, please find affiliate links to the Kat Scrappiness Products I've used and thanks for visiting.  Until next time, Happy Crafting!

Donna 

Affiliate Links (if used, they are at no cost to you and provide me a small commission that enables me to stay crafty).
Sun Spot Background Die by Kat Scrappiness
from: Kat Scrappiness, Inc Gold Mine Rhinestone Mix - New Release
from: Kat Scrappiness, Inc Embellishment Spoon by Kat Scrappiness - New Release
from: Kat Scrappiness, Inc

**Challenges Entered:

Saturday, July 24, 2021

Watercolor Bouquet Slimline

Good Day Friends!  Today I'm sharing a slimline card created using the Altenew Watercolor Bouquet Layering Stencil.


This is a 2 layer stencil that is quite large as you can see by the image, which is on a standard sized slimline card base.  I've blended Altenew inks to create the 2 tones of Aqua Blue and used snippets of Bo Bunny patterned paper to accent.  For a bit of shine, I splattered Gansi Tambi Starry Metallic Watercolors in Gold. 


The die cut and stamped sentiment are from Gina K. Designs.  I've adhered the die cut flat and popped up the strip on craft foam.  The right corners have been rounded for a different look.

Thanks for stopping by.  Until next time, Happy Crafting!

Donna

**Challenges Entered:

Monday, July 19, 2021

Pammie's Inky Pinkies with CAS_ual Fridays

Hello Again!  Today begins a new challenge week at Pammie's Inky Pinkies and the sponsor this round is the generous CAS_ual Fridays Stamps.

For my design team project, I created a traditional sized slimline card using the "Floating" Stamp Set which is now retired.  The card measures 8.5" x 3.5".


To start, I stamped and heat embossed the Balloon image for an ink resist technique.  I blended Catherine Pooler Inks in the colors of Party Dress, Tiki Torch, Bellini and Limoncello.  Once dried, I rubbed the excess ink sitting on the heat embossing with a Microfiber towel.  


The sentiment is from the same set and stamped with Versafine Onyx Black Ink.  I mounted the sentiment strip on craft foam, matted the focal panel with black card and adhered to a card base of Neenah Classic Crest Solar White 110 lb. cardstock.  Lastly, I added enamel sparkle dots in the same shades as the inks.

Please join us this week at Pammie's Inky Pinkies!  Until next time, Happy Crafting!

Donna

**Challenges Entered:


Friday, July 16, 2021

Altenew Academy AECP - Easy Ink Blending Techniques

Hello Friends and Happy Friday!  I'm back today with 2 projects for the Altenew Academy AECP Course: Easy Ink Blending Techniques.  This course teaches techniques for seamless ink blending with some added twists.  

I used to think ink blending was difficult and when I first tried a few years ago, I was rubbish at it.  I will be honest, the technique take a bit of practice and the right tools for a smooth blend.  Even though ink blending is not new to me, I gained knowledge from this course with techniques I never thought of trying. 

For my first project, I used the "traditional" ink blending technique taught in class.  I masked the center of the card panel and ink blended 4 shaded of blue inks, starting with the darkest on the edges and using lighter shades as I blended inward.  


I allowed the panel to dry completely before removing the mask.  I stamped the Tree and Sentiment, which are from the Altenew Festive Silhouettes Stamp Set, using Black Pigment Ink.  I replaced the mask and splattered the piece with Gloss White Acrylic Spray.  


For this technique, I used blending brushes, which I find give me a smoother blend than the foam pads.  To finish up this card, I matted the focal panel with black card, mounted on craft foam and adhered to a 110 lb. card base.

My next project features ink blending and a bit of water coloring with inks.  This was another technique taught in class that I've never thought of and I'm surprised because it's so obvious and easy to do.


To start, I ink blended on the right bottom half of the card panel using blending brushes and 4 colors of complimentary inks.  I used Canson Mixed Media Paper as I knew I would be using water on the piece.  After the ink dried, I stamped the Altenew Paint-A-Flower Clematis Josephine image over the ink blending.  


Next step was to use darker shades of the inks I used to blend, add water to the areas I wanted to appear darker and add the darker inks to the wet areas.  This technique leaves the ink blending fairly intact and allows for the "watercolor" look with added shading.  Once everything was dry, I splattered the piece with watered down Violet ink and Gloss White Acrylic Spray.

I did not have a snippet of card in the fuchsia/violet color so I ink blended the top and left side of the snippet, adhered the focal panel, matted with black card, mounted on craft foam and adhered to a 110 lb. card base.

To finish, I heat embossed the sentiment, from the same stamp set, on a snippet of black card, mounted on craft foam and adhered to the card base.  Lastly, added sequins for a bit of shine and interest.

I thoroughly enjoyed this course and was very pleased with the finished cards.  Most of all, I liked the idea of taking ordinary ink blending to new heights.  Thanks for visiting and reading through my post today.  I'll be back soon with another AECP project so until next time, Happy Crafting!

Donna

Products Used:
Catherine Pooler Inks
Neenah Classic Crest Solar White Card Stock (110 and 80 lb)
Blending Brushes from Amazon
Ranger Fine Detail White Embossing Powder
Recollections Black Cardstock 80 lb
Sequins - Unbranded

**Challenges Entered:
Holiday Card:


Clematis Josephine Card:


Wednesday, June 23, 2021

Big Dreams of Tropical Locations

Hello and Happy Wednesday Crafty Friends!  Today's card is an easy one, made with dies and ink blending.  It's my take on a Sweet and Simple design...or possibly a Clean and Simple Design.


My card was created using only dies and ink blending.  I dug into the stash again to find these dies from Diamond Press and purchased on HSN a few years ago, the inks are Catherine Pooler.  I die cut the glasses and words out of black card 3 times and from ink blended card once to create a dimensional, drop shadow effect.

Summer is the time for Big Dreams and since we are slowly coming out of COVID lockdown, I'm dreaming of a Cruise to a Tropical destination.  The Cruise Ships are opening up soon but I'm still not comfortable cruising yet so possibly in the Fall or next Spring.  In the meantime, I'll settle for the pool at home.

Until next time, Happy Crafting!

Donna

**Challenges Entered:


Thursday, June 10, 2021

Just Because....

Hello My Crafty Friends!  It's Thursday and I have a make to share just because....it's Thursday!  This card features stenciling, ink blending, embossing and splattering.


I started this A2 card by stenciling the blooms and leaves, which are from the Altenew Greenwood Flowers Layering Stencil Set, with Catherine Pooler Inks.  I embossed a panel of Neenah 80 lb. Classic Crest with the Altenew Row of Squares 3-D Embossing folder and blended Catherine Pooler ink over top.  

I fussy the flowers and leaves, arranged on the card panel; popping up the front bloom with foam pads, splattered all with more of the blue ink and Dina Wakley White Glossy Acylic Spray and lastly, stamped the sentiment, which is from an older Hero Arts Sentiment set.

I truly love Blue, White and Yellow for a Summer palette...how about you?  Until next time, Happy Crafting!

Donna

**Challenges Entered:

Tuesday, June 8, 2021

You Are Lovely

Hello and Happy Tuesday!  Today's card features stenciling and stamping; 2 simpe technqiues that create a pretty card.


I started the card with a 5" square panel of Neenah Classic Crest Solar White 80 lb. card and a new stencil I recently received; the Sweet Spring Stencil from Altenew.  Using Mint to Be and Aquatini Dye Inks from Catherine Pooler, I stenciled the rose bouquet.  This is a 2 layer stencil and very easy to line up and blend through.

I stamped the sentiment from the Maymay Made It All About You stamp set onto the card base but wasn't happy with the "are lovely"..it wasn't straight but an easy fix, I stamped again on a banner cut with a MFT Stitched Sentiment Strips die.  It's still not as straight as I prefer but the card is Handcafted, not Hallmark..right?  Lastly, enamel sparkle dots added for additional interest.

Thanks for stopping by and until next time, Happy Crafting!

Donna

**Challenges Entered:


Saturday, June 5, 2021

Bugaboo Saturday Summer Sign

Hello and Happy Saturday!  Today begins a new bi-weekly Anything Goes challenge on the Bugaboo Stamps Catch the Bug Challenge Blog.  My design team project today is a card celebrating Summer.

Summer Dreams of Camping, Fishing, Swimming, BBQ'ing, Fireworks, Holidays and the Beach are filling my head.  

For my card, I colored the Summer Sign digital stamp with Spectrum Noir Alcohol Markers, ink blended a sky using the Mini Cloud Edges stencil from My Favorite Things, Die cut rolling hills and blended all with Salvaged Patina and Cracked Pistachio Distress Oxide Inks from Tim Holtz.  Please stop by the challenge blog and enter your design, we would love to see what you create!

Until next time, Happy Crafting!

Donna

**Challenges Entered:


Thursday, May 20, 2021

Fairy Dust Makes Everything Better

Hello and Happy Thursday!  Today's make and share features ink blending, Splattering and die cutting...mixed with a little Fairy Dust.


To create the design, I ink blended an area with shades of blue distress oxide inks; I wanted the edges uneven so I tore pieces of copy paper and tacked down with removable adhesive.  I splattered the area with White Gloss Spray by Dina Wakley and drops of water.  I doubled-up the die cuts for thickness/dimension and arranged how I wanted them.  The sentiment strip, which is from the Simon Says Stamp Encouraging Sentiment Strips Pack was added but in hindsight, I wish I would have popped up on foam pads.  Lastly, added sequins for sparkle and shine.  You are your own Superpower!

Until next time, Happy Crafting!

Donna

**Please stop by our challenge at the Inspiration Station!  It's an inspirational challenge and your interpretation of the photo is your own!  Visit and Enter :)

**Challenges Entered:
Craft Rocket - Blue/White is a Fav for a clean look
Die Cut Divas - Used Uneven Edge, Friendship and Flowers


Monday, May 17, 2021

Inspiration Station Challenge #6

Hello and Happy Monday!  I trust your weekend was lovely and you enjoyed some time outdoors.  Today starts a new challenge at Inspiration Station and the inspiration photo is:


When I first saw the inspiration picture, I thought Vintage but I'm rubbish at Vintage, Shabby Chic or anything related to that style.  I'm all about color and my projects over the years certainly reflect that so I had to put my thinking cap on.  I came up with this:


I had a snippet of card left, from another project, that has a musical note design (and now that I look at it here, it appears I've placed it upside down - LOL) that became the base layer, I stamped, heat embossed, die cut, and ink blended over whimsical floral images from a Woodware Set and arranged a small cluster.  The sentiment strip is from the Tim Holtz Small Talk strip set.  

Please join us at The Inspiration Station this round, the challenge ends 06 June 2021 so there is plenty of time to get creative.  Until next time, Happy Crafting!

Donna

**Challenges Entered:


Saturday, April 3, 2021

XOXO

 Hello and Happy Satur-YAY!  Today's make and share features ink blending, stenciling and die cutting.


I stenciled over a 3.75"x5" panel with a stencil and distress oxide inks.  I added a simple sentiment with die cut letters and sequins for a bit of shine.  My version of a Clean and Simple card but I call it a Sweet and Simple card because of the colors added and not much white space.

Have a wonderful day and until next time, Happy Crafting!
Donna

**Challenges Entered:


Friday, March 12, 2021

Find Your Song

Good Day and Happy Fri-YAY!  The week flew by and we're counting the Days until Spring.  Today's make and share is my take on a Simple Design and features ink blending with simple stamping.  


I wanted to create a simple card where the ink blending was the star.  Using a stencil and Distress Inks, I created a soft sky full of fluffy clouds.  I stamped a Cherry Blossom Branch and bird with a sweet sentiment - all from an older Gina K. Designs Stamp Set titled "Birds & Blossoms 2".  I'm not certain if the set is still available for purchase on the Gina K. Designs online shoppe, I purchased throught eBay.

Have a blessed day and great weekend and until next time, Happy Crafting!
Donna

**Challenges Entered:


Monday, February 22, 2021

Happy Gnome Patrick's Day

 Hello and Happy Monday!  I hope your weekend was relaxing, and if you have been affected by the Winter's Storms, I do hope you are safe, warm and well.  

Today's post features a cute St. Patrick's Day Gnome, die cutting, heat embossing, stenciling, ink blending and hand coloring. 

This A2 sized card was inspired by a Gina K. Designs You Tube video.  The background panel was stamped with the Gina K. Music Medley background stamp and heat embossed with white powder.  Using a stencil, I blended Gina K. inks over the panel to reveal areas of embossing.  The focal image and scalloped border were die cut and mounted on foam pads.  A ribbon, bow and gems added to complete the look.

He's a cutie patootie whose handong out shamrocks.  This was fun to create and I do like how it came together.  Until next time, Happy Crafting!

Donna

**Challenges Entered:
Use Your Stuff - I love Heat Embossing and especially the Resist Method


Tuesday, February 16, 2021

You Are Beautiful

Hello and Happy Tuesday!  Todays make features a beautiful Sunflower and Ink Blending created with all those suffering with the unbearable cold, snow storms and loss of power this winter in mind.


Sunflowers are my favorite Summer and Fall flowers, I usually plant them twice a year.  I created this card with an ink blended background panel; using Fun Stampers Journey and Distress Oxide Inks in the colors Lemon Drop, Limeade Splash, Orange Rave and Mowed Lawn.  The stamps are from the Fun Stampers Journey "Hello Sunflower" Stamp Set.

To complete the card, I added two pieces of scrap designer series paper to the left side along with a strand of Journey Gift Twine (it has a gold thread running through it) and some mini pearls.  I also added the black dots around the flower, those are not part of the stamp.

Have a Great Day, Stay Warm and Safe.  Until next time, Happy Crafting!
Donna

**Challenges Entered:


Saturday, January 23, 2021

Winter Woodland Scene

 Happy Saturday!  Today's post is a quick one featuring a Woodland Winter Scene created with dies and ink blending.


Distress Oxide Inks used in the colors Peacock Feathers, Faded Jeans, Wilted Violet and Blueprint Sketch along with Woodland and Oval dies from my stash.  A spalttering of water and Shimmer Spritz for a wintery and snowy sky.  

It will soon be time for Valentine's Day crafting but I have a few New Year and Winter cards to share in the coming days.  Until next time, Happy Crafting!

Donna

**Challenges Entered:
Just Us Girls


Wednesday, October 14, 2020

Weeds and Wildflowers

 Hello and Happy Wednesday.  Gosh..October is marching right along and I can see the holidays right over the hill....Yikes!  Today's make and share features a lovely silhouette of wildflowers and ink blending.


I used the Gina K. Designs Autumn Silhouettes Stamp Set and Distress Oxide Inks to blend a simple and quick card for a buddy swap.  I love the sentiment and the colors are a bit different than the traditional Autumn colors.  I am very pleased with how the inks blended together, which is a trait of the distress oxides that I appreciate; ink blending can be tricky business.  For a final touch, I added water splatters and Nuvo Crystal Drops in Clear to create added interest to an otherwise simple card.

Thanks for stopping by and until next time, Happy Crafting!
Donna

**Challenges Entered:

Monday, September 21, 2020

Thankful Leaf Print

 Hello and Happy Monday!  It's been a whirlwind day but I do have a make to share.  This card was inspired by a Video on the Gina K. Designs You Tube Channel.  It features a hibiscus leaf, heat embossing and ink blending.


I went in search of a leaf, I really wanted a Maple or Oak leaf but I'm in Florida, so the closest I could find was a Palm Frond or a Hibiscus leaf...I chose the latter.  I washed and dried the leaf, inked it up with VersaMark Embossing Ink and pressed it onto a piece of white card.  I sprinkled fine clear embossing powder and heat embossed the image.  

I used the new Ranger Crackling Campfire Distress Oxide Ink along with Fossilized Amber and Dried Marigold Distress Oxide Inks to blend color over the embossed leaf image.  This is what started to appear and I just love it!  I'm so impressed with the hibiscus leaf and I think it's just as pretty as a Maple leaf.

For a finishing touch on this A2 sized card, I added a one word sentiment popped up on thin foam pads and gold sequins for that bit of sparkle.  My Autumn card is complete....the colors blended nicely, Awww....I love Autumn!

Until next time, Happy Crafting!

Donna

**Challenges Entered:
Creatalicious #195