Saturday, December 25, 2021

Celebrate!

Hello Crafty Friends!  It is Christmas Day and I wish you all a very Merry Christmas.  Soon it will be the New Year and I pray the coming year brings an end to the COVID pandemic with peace and love in our communties.  Soon it will be time to Celebrate and that is the theme of my polychromatic card today....Celebrations for new beginnings.

For my card today, I've used the Altenew Floral Fantasy Stamp and Coordinating Die set and the Mega Label Love Sentiment Set to creat a colorful celebration card.


To start, I ink blended a background panel using Catherine Pooler inks.  After the panel dried, I wanted an appearance of texture so I smooshed deeper shades of blue inks onto the panel and splattered with black and white acrylic gloss spray. 

The florals and leaves were stamped using Catherine Pooler inks; for the last stamp layer on the florals, instead of using a darker ink, I stamped with watermark ink and heat embossed with fine detail silver embossing power.  The focal images were then cut using the coordinating dies.


The sentiment was stamped, cut and popped on craft foan with a nest of Altenew Metallic Thread attached behind for interest and texture.  Lastly, white, irridescent sequins were added for shine.

Thanks for stopping by today, I hope your holiday is blessed.  Until next time, Happy Crafting!

Donna

**Challenges Entered:

Monday, December 20, 2021

Pammie's Inky Pinkies - We Are 3 Digital Papers

Hello and Happy Monday!  I'm back to announce a new challenge week has started at the Pammie's Inky Pinkies Challenge Blog!  Our sponsor this round is the generous We Are 3 Digital Shop.  


For my design team project, I've created a holiday themed card with a New Year Wish using the Winter Digital Paper Pack from We Are 3 and the Big World Stamp and Coordinating Die Set from Altenew.


The Globe is a layering set with stamps for all the continents.  The coordinating dies cut the Earth image and the Stand.  I stamped the image using Catherine Pooler inks, cut the globe stand out of silver mirror card and used a digital paper as the base panel.  The paper has a ripple design which reminds me of the ocean.


I've heat embossed the sentiment and added embellishments from Kat Scrappiness.  This completes my DT project, please visit the Challenge Blog at Pammie's to see what my teammates have created for this last challenge of 2021.  Merry Christmas and may there be Peace, Love and Joy for us all in 2022.

Unil Next Time, Happy Crafting!

Donna


Inspiration Station - Winter Beauty

Hello Crafty Friends!  Today begins a new fortnightly challenge at The Inspiration Station.  Our inspiration photo prompt this round is Winter Beauty.


I was inspired by the colors and the gender of the subject.  For my design team project, I've created a Gift Tag using an image from the Polkadoodles "Angelberry Christmas" digital set. I am unable to find this set on the Polkadoodles shop site in order to tag it; I have the collection on a CD-ROM.


I've colored the image using Spectrum Noir Alcohol Markers and the Tag was cut from a snippet of Kat Scrappiness "Rainbow Dreams" designer paper.


The sentiment is from a Gina K. Designs Holiday set, snowflake die cut from my stash and silver embellishments from Kat Scrappiness.

We hope you'll join us at The Inspiration Station for this last challenge of 2021.  I wish you and yours a very Merry Christmas and Joyous New Year!

Until next time, Happy Crafting!

Donna

**Challenges Entered:


Mid-Month Inspiration at Jan's Digi Stamps Challenge

Hello and Happy Monday!  I hope your weekend was great and you're ready for the Christmas Holiday.  My gift shopping is complete, I will need a trip to the Grocery before Friday.  Chrismas seems to come quicker and quicker the older I get.

Today's post features my mid-month inspiration project for the Jan's Digi Stamps Challenge Blog.  The current challenge ends 02 January 2022 so there's plenty of time to enter.

For my project, I've used a digital image from Jan's Christmas Holly Set.  I've colored the image with Spectrum Noir Alcohol Markers and matted with a panel of gold mirror card.


My card meaures 5.5" square and the sentiment is from the same digi set.  For a bit of interest, I used a punch to create decorative corners.  I have so many fancy punches and at the moment, they seem to be out of style but I like to use those older crafting tools...when I remember I have them!


To finish off my sweet and simple card, I've added red gems from Kat Scrappiness.  I invite you to stop by the challenge blog and have a look at what my teamies have been up to and join in the challenge!

Until Next Time, Happy Crafting!

Donna

**Challenges Entered:


Sunday, December 19, 2021

Altenew Academy Level 2: Polychromatic

Hello Crafty Friends and Thanks for visiting!  Today, I'm sharing my submission to the Altenew Academy Level 2 Course:  Polychromatic.  The course lessons detailed ways to create colorful projects using a variety of coloring mediums and explains the term Polychromatic and brought to my attention something I've been doing for years with actually naming it. 

The definition of Polychromatic is showing a variety of 2 or more colors; multicolored.  Polychromatic designs are my favorite and the style I most use.  For my project, I've used 3 complimentary colors, 1 of which uses a monochromatic palette to create a Card of Encouragement.


Using the Fantastic Floral Fantasies Creativity Cardmaking Kit by Altenew, I die cut the layering flowers using colored cardstock I created with Gansai Tambi watercolors.  I used light, medium and dark shades of pink for the florals and shades of greens for the leaves.   Prior to die cutting, I splattered the card with white paint and spritzed with Shimmer Mist.

I embossed a panel using a Basketweave patterned folder and adhered to a cardbase of 110 lb. Neenah Solar White card.  I arranged the florals and leaves and picked up the arrangement using Press and Seal plastic wrap.  *Tip:  using Press and Seal to pick up the arrangement keeps it together and makes it easy to adhere when ready.


The sentiment is die cut from a Christmas present I received from a dear crafty friend; I love the thin and scripty font.  Lastly, I've added black enamel embellishments from Kat Scrappiness.  The black sentiment and embellishments add the perfect amount of contrast to create a POP of color from this gorgeous florals and leaves.  

You're probably creating polychromatically without thinking about it.  I know I do as I love lots of color in my designs.  The Altenew courses are interesting and extremely useful in terms of ideas and inspiration.

Until next time, Happy Crafting!

Donna

*Challenges Entered:


Wednesday, December 15, 2021

Kat Scrappiness Candy Bar Wrappers

Hello Friends!  I'm on the Kat Scrappiness Blog today sharing 2 festive projects using some fun papers and die cuts from Kat Scrappiness.

Before I get to my projects, I want to remind everyone of the Stamp and Scrapbook Expo Sale at the Kat Scrappiness Shop.  From now until the 18th of December, save 15% on all products in the Christmas - Hanukkah - New Years themed category using the code:  XMASEXPO


Now for the Good Stuff!  I've created 2 Candy Bar Wrappers!  The Recipe is below and if you make one, you'll want to make a bunch!


The wrappers are easier to put together than you may think and make a great stocking stuffers.  These particular wrappers cover a King Size Hershey Chocolate Bar.  Here's how I put them together:
  • Trim a piece of white card to 6" x 7" (or use any color you wish for the base).
  • Score on the 6" side at 2.25", 2.5", 4.75" and 5".
  • Fold and burnish on the score lines.
  • Trim a piece of designer paper to 2 1/8 x 6 7/8 to cover the front or top of the wrapper.  For my designer papers, I've used snippets of card from the Kat Scrappiness Rainbow Dreams and Rainbow Confetti Slimline paper packs. 
  • Adhere your designer paper and any embellishments you wish to add on the front of the wrapper.
  • Assemble the Wrapper using heavy duty double sided tape along the back seam.  

For my embellishments, I've used the Christmas Wishes Word Die with Shadow, colored a Christmas Tree from the Quokka Christmas Costume Add-On Stamp Set, ribbon, Baker's Twine and glitter card from my stash.  The Candy Bars fit snuggly within the wrappers but not too snug as to be difficult getting them in and out.  

We are getting close to the big day so if you're in need of something quick and easy, try these candy wrappers for those last minute Stocking Extras.  They would also make wonderful gifts for Teachers, Neighbors, Friends, the Postal Carrier, the Amazon Driver (if you're like me - you're on a first name basis with them). 

I want to wish you and yours a very Happy Christmas and Joyous New Year.  May your Christmas be filled with Love, Joy and Gratitude.

Thanks for your visit!  Until next time, Happy Crafting!

Donna

**Challenges Entered:


Friday, December 10, 2021

Altenew Academy Level 2 Course: Creative Watercolor Media

Hello Crafty Friends!  Today I'm sharing my project for the AECP (Altenew Educator Certification Program) Level 2 Course:  Creative Watercolor Media.  The basis of this course is to teach, share and encourage the use of various watercolor techniques.  For my project, I've created a Happy New Year Card with an ethereal background using watercolor paints and shimmer spray.


To start the cardmaking process, I created a dreamy background panel using Gansai Tambi watercolor paints and Strathmore Watercolor card.  For this technique, it's best to use watercolor card as the process does use a fair bit of water and the card must hold up. 

Mixing shades of blues and purples, I dropped watercolor randomly on a pre-dampened panel of watercolor card.  Using my heat tool, I dried the panel in between adding color in order to build up the color without turning them "muddy" or loosing the intensity of each color.  

Once I was happy with the color combination, I set the panel aside to dry completely.  Once dry, I spritzed the panel with Shimmer Spray and set aside once more to dry.


Next was to stamp, heat emboss and die cut images from the new to me Altenew "Happy Dreams" Stamp and Coordinating Die Set.  Using complimentary shades of colored embossing powders to match the background panel, the images and sentiment were stamped and heat embossed.  The images were cut using the coordinating dies and the sentiment was cut using a circle die.


I did a dry run arrangement on my panel so I would know where I could stamp stars and 2 additional sentiments.  Using the Altenew's "Cloudy Night" Crisp Dye Ink mini cube; which is part of the Gentleman's Gray Mini Cube Set, I stamped the star clusters and sentiments.  I preferred the look of gray ink here; not as harsh as black and it fits my ethereal theme.

Lastly, time to arrange my focal images and once arranged, I picked up the cluster using Press and Seal Plastic Wrap in order to keep everything in it's place.  I've added craft foam behind the cluster and adhered to the panel using liquid adhesive. To complete the design, I've added Gray Opal Faux Pearls.

I'm very pleased with this watercolor technique; it's easy and creates wonderful results.  Each time you play with watercolor in this way, no two backgrounds will be the same and that appeals to me.  

Thanks for visiting today and until next time, Happy Crafting!

Donna

**Challenges Entered:


Monday, December 6, 2021

Pammie's Inky Pinkies Challenge - Happy New Year

Welcome Back to my blog Crafty Friends and Happy Monday!  Today begins a new challenge at Pammie's Inky Pinkies and the sponsor this week is Mo's Digital Pencil.  I'm super excited as I love Mo's images! 

For my design team project today, I've created a standard A2 sized card using the Skating Gnomes digital stamp from Mo's Digital Pencil.  Aren't these little fellas adorable?


I've colored the images using Spectrum Noir Alcohol Markers, fussy cut and set aside to work on a wintery panel.  Using Strathmore Watercolor card, I ink smooshed shades of blue distress inks to create an icy skating area.  After the panel dried, I spritzed with Gloss White Acrylic Spray and Shimmer Spray, then die cut using an oval die.


The designer papers are from the Doodlebug Design "Winter Wonderland" 6x6 paper pad and the cardbase is 110 lb. Neenah Solar White Classic Crest.  The sentiment is part of a digital set from The Verve, which is no longer in business.  

The oval has been popped up using craft foam with the Gnomes adhered flat.  Lastly, embellishments from the Kat Scrappiness Sparkling Snow Pearl Mix have been added for extra interest and shine.

Thanks for visiting today and please stop by Pammies, enter your make for a chance to win a prize package from Mo's Digital Pencil.

Until next time, Happy Crafting!

Donna

**Challenges Entered:


Inspiration Station Challenges #19 - Fancy Stars

Hi Friends and Welcome!  Today is a busy day with lots of challenge starts and projects so I'll jump right in.  Today begins a new challenge round at The Inspiration Station with the following photo prompt as inspiration:


For my design team project, I've created a Christmas card using the Fancy Star Builder Stamp Set from Altenew and various inks from Catherine Pooler.  I was attempting to create a Retro Rainbow look.


This stamp set is cool; there are many combinations that can be made with the included stamps.  This is a new set to me, having recently acquired it so the inspiration photo and challenge round is perfect for this set.


The sentiment comes from a Gina K. Designs set and I've kept the card fairly sweet and simple, adding a few fax crystal gems to the star centers.

Please join us this challenge at the Inspiration Station.  Let your creativity flow, we would love to see how the photo prompt inspires you.

Until next time, Happy Crafting!

Donna

**Challenges Entered:


Jan's Digi Stamps Challenge - Lumberjack Snowman

Hello Friends!  It's the 1st Monday of the Month and that equals a new challenge at the Jan's Digi Stamps Challenge Blog.  Our themes are Always Anything Goes and today, my design team card features a Lumberjack Snowman!

Before I get to my card, I would like to remind everyone of the Monthly Sale that is currently going on at Jan's Shop.  Several new sets are on sale until Christmas Day and Jan is offering a FREE set also.  So please stop by and check out the sale and get your Free Set!


The snowman image comes from the Snowglobe Family Digital Set.  This set contains 5 pre-colored images, 5 B/W line images and 5 sentiments.  I colored my snowman using Spectrum Noir Alcohol Markers and gave him a Lumberjack look, then fussy cut him and set aside to work on a background panel.


I created a panel for my snowman to live on by smooshing Strathmore Watercolor card into various diluted shades of pink and red distress inks.  Using a Kat Scrappiness Stitched rectangle die, I cut the panel and mounted on craft foam for dimension.  

The designer papers are from the Echo Park "A Lumberjack Christmas" 6x6 paper pad, the cardbase is 110 lb. Neenah Solar White Classic Crest card and embellishments from the Kat Scrappiness Sparkling Snow Pearl Mix have been added for extra interest and shine.

We hope you'll join us at Jan's Digi Stamp Challenge this month.  We hope to inspire you with our designs and can't wait to see your makes.  Until next time, Happy Crafting!

Donna

**Challenges Entered:


Sunday, December 5, 2021

A Happy Holidays Wish for You

Hello Friends and Happy Sunday!  I'm on the Kat Scrappiness Blog today sharing a Holiday card created using a few of the newest products from Kat Scrappiness.

Before I get to my card, I wanted to remind everyone of the wonderful papercrafting tools Kat Scrappiness has to offer.  The blending brushes, embellishment spoon, retractable embossing powder tool and teflon bone folder are just some of the newest products in the shop.  These make crafting a breeze and would be wonderful gifts for your crafty friends too!


My card measures 5" square, uses die cuts only and is easy to mass produce.  To create the card, I die cut 3 sizes of circles using designer papers from the Kat Scrappiness Ugly Sweater Slimline Paper Pack.  I arranged the die cuts on a mat of 65 lb. red card and adhered everything flat to a cardbase of 110 lb. bright white card using liquid adhesive.


The sentiment is the Happy Holidays Word Die with Shadow and has been cut from black card and a snippet of Ugly Sweater designer paper.


I've popped the sentiment and shadow on craft foam for dimension and lastly, added embellishments from the White Rhinestone Mix and Wink of Stella to the word sentiment.  This embellishment mix, along with many other mixes are currently marked at 50% off the original price.  Kat Scrappiness has the best embellishments and now is a great time to stock up!

Thanks for visiting today!  Have a wonderful week ahead and until next time, Happy Crafting!

Donna

**Challenges Entered:


Friday, December 3, 2021

Altenew Academy Level 2 Course: In the Mood for Color

Hello and Happy Friday!  I know it's been a few weeks (months maybe) since I've posted a course project for the Altenew Certified Educator Program.  I'm back on track and today I'm sharing my project for the Level 2 Course:  In the Mood for Color.

This course was enjoyable and each class is a lesson on individual color and how it relates to our emotions.  I've always known that colors can affect our emotions and even our purchasing decisions; pay close attention to the next advertisment / Televison commerical you see...notice how they tie color to the theme and what they are promoting.  

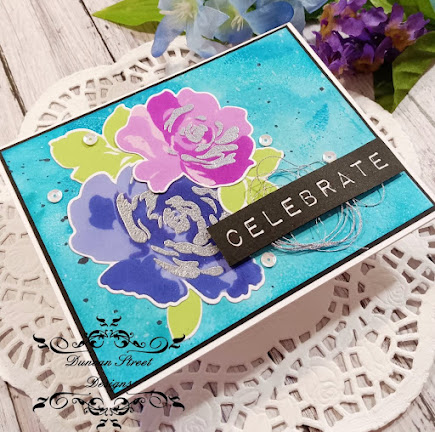
Purple has always been my favorite color.  I'm immediately drawn to purples, lilacs and lavendars; I even love the smell of lavendar.  Purple has long been associated with Wealth, Royalty and Luxury but it is also Calming, Spiritual and Romantic.


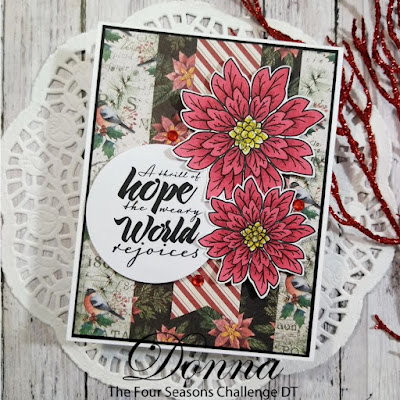
For my course submission, I've chosen to use Purple as my main color choice and the Altenew Poppy Arrangement Stamp and Coorindating Die Set to create an A2 sized card.  This set is new to me and naturally, the purple poppy variety are my favorite, then I would choose the traditional red flower.


To start, I stamped the floral image using Memento Tuxedo Black ink; which is an alcohol marker compatible ink, onto a snippet of specialty cardstock that's recommended for alcohol markers. I colored the image and die cut using the coordinating dies.  

I've created a panel by stenciling and ink blending with 2 shades of purple ink.  I sprayed the panel with black and white gloss acrylic spray and set aside to dry.


I've stamped the sentiment, from the same set, and die cut using an oval die.  I've trimmed and adhered the inked panel flat to a cardbase of 110 lb. heavyweight cardstock.  The sentiment and floral were popped on craft foam for dimension and arranged on the card panel.  Lastly, faux violet pearl gems have been added to more interest and shine.

I love color and incorporate color into my projects, home decor and clothing.  I'm drawn to certain colors; specifically reds, yellows and blues but purple is my number one choice every single time.  I have many of the personality traits that represent purple also:  Introvert, Creative, Sensitive, Compassionate, Dreamer, Emotional.  If you haven't checked on your Color Personality, do so.  You'll find it interesting and will discover you ave many of the personality traits that your color represents. 

Thanks for visiting today.  Until next time, Happy Crafting!

Donna

**Challenges Entered:


Wednesday, December 1, 2021

The Paper Funday Challenges #36

Hello!  I'm back with another post announcing the new monthly challenge at The Paper Funday Challenges.  The theme is always Anything Goes with an Optional Twist; the Twist this month is Holidays.  We also have 2 wonderful sponsors:  Polkadoodles and My Besties.

Before I get to my project, I have some exciting news!  The Paper Funday Challenge is partnering with The Double Trouble Challenge from 06 December through 02 January.  Please visit Double Trouble and enter their challenge for a chance to win their prize package also! 


For my design team project, I've created a Christmas card using the Steampunk Snowman digital image #781 from My Besties. 


Snowmen are my all time favorite holiday/winter images; I collect them so when I saw this image, I couldn't resist.  I mean, who doesn't love a Steampunk Snowman?  My card measures 5" square, designer papers are from a 12x12 Martha Stewart paper stack and I've colored the image with Spectrum Noir Alcohol Markers.


My card base is 110 lb. Neenah Solar White Classic Crest, I've popped the focal image and panel along with the sentiment strip on craft foam for dimension.  The snowflake paper has gorgeous gold foiling which adds to the Steampunk vibe.  Lastly, I've added gold sequins for added sparkle and shine.


Doesn't it seem like this year has flown by?  Or is it me?...the older I get, the faster time flies....my Mama used to say that all the time and I never paid much mind to it..until now.  I hope you've started shopping for Christmas prezzies....I got a jump on it and have some wrapped and under the tree.  Maybe this year, I won't get so frazzled the last week.

Until next time, Happy Crafting!

Donna

**Challenges Entered:
Double Trouble - allowing backlinks from the PFD team


The Four Seasons Challenge - December 2021

Hello Crafty Friends and Happy 1st of December!  Today begins a new challenge month at The Four Seasons Challenge Blog and it's Anything Goes that's Winter related.  


For my design team project, I've used a Poinsettia digital image and sentiment from the Verve Store.  Verve has since closed shop but I was lucky enough to purchase a holiday set before the virtual doors closed.


I've colored the florals using Spectrum Noir Alcohol Markers and fussy cut.  The designer papers are from the "Merry Christmas" 6x6 paper pack from Alina Crafts on Amazon.  


The sentiment has been cut using a circle die then popped on craft foam, along with the florals, for dimension.  Lastly, red faux gems and Gold Stickles have been added for that holiday sparkle and shine.

Please visit the Four Seasons Challenge Blog this month and enter your Winter Themed projects for a chance to win a great prize!

Until next time, Happy Crafting!

Donna

**Challenges Entered: