Thursday, September 30, 2021

Altenew Academy - Beyond Basic Backgrounds

Hello Crafty Friends!  I've passed my Level 1 Altenew Academy courses and have been given the go-ahead to start Level 2.  The first course for Level 2 is Beyond Basic Backgrounds.  I thought I knew all the great techniques for creating awesome backgrounds but I learned a few more brilliant ones.  Today I'm sharing a technique that may not be new to you; and it wasn't to me either, but was one I needed reminded of.


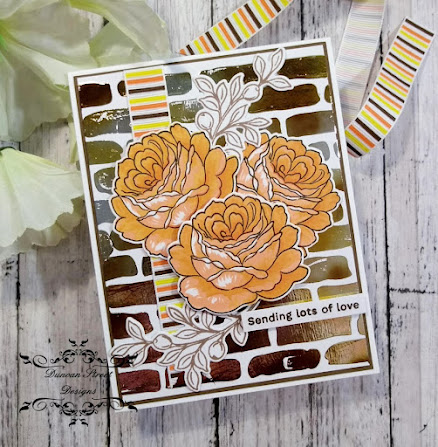
One of examples had the Instructor using a foiling technique and I had all the supplies needed to do the same.  I stenciled Hot Foiling Gel through a Brick Wall Stencil on a panel of Neenah Solar White 80 lb. card.  I set the panel aside to dry and proceeded to work on the floral images.  TIP:  When using foiling gel, texture pastes and the like, wash your tools quickly and completely before the medium dries.  Once dry, it will be very hard to remove or possibly not be removable at all.

Using the Altenew/Simon Says Stamp Collaboration Set for Stamptember 2021; From the Rose Bush, I stamped layers of Yellow and Orange inks to create 3 Autumn Rose Blooms. For the sprigs, I stamped in a Light Brown ink and die cut all using the coordinating dies.

Once my panel was dry, I placed a piece of  foil on top of the dried gel, placed the panel in a carrier sheet (I use waxed paper) and ran it through my heat laminator. After allowing it to cool just a sec, I peeled the foil sheet away and what was left behind was a gorgeous, shiny, foiled brick wall design.


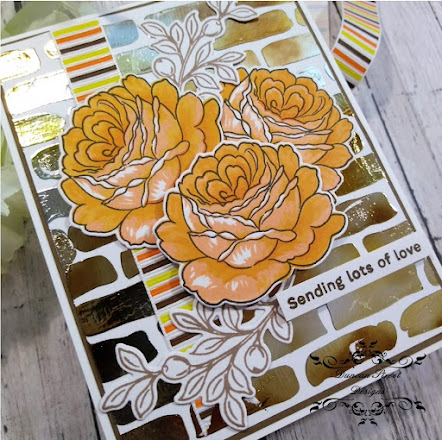
Next step was to arrange my florals and pick up using Press and Seal Plastic Wrap.  I adhered a strip of ribbon to the foiled panel and backed with brown card before adhering to my card base.  I added adhesive to the backs of my florals, leaving the front bloom without adhesive as I was mounting on craft foam for dimension.  I place the arrangement on the panel and made certain all were adhered well.  Lastly, I stamped a sentiment from the same stamp set, added craft foam behind the strip and adhered to the card front.  Project Complete!

This was a great lesson that refreshed techniques I've used in the past as well as shared techniques that were new to me.  It was nice to have a play with stenciling and foiling to create a very eye-catching background.

Until next time, Happy Crafting!

Donna

Challenges Entered:
As You Like It - Autumn is my Fav time of year.  I love the Colors and Crisp Air


Wednesday, September 29, 2021

National Coffee Day 2021

Hi Crafty Friends and Happy National Coffee Day!  I don't know about you but I love my Coffee....Hot, Iced, with Flavored Cream...you name it...I'll take it!  In celebration of this day, I've created a Coffee Themed Card to share with you today.


My card was created using digital coffee themed papers I had in my stash from Imagine That.  I've also used the Kat Scrappiness Layered Coffee Cut Die SetGot Coffee ? Word Die and Coffee Bean Embellishments.


I've kept the card design fairly simple using only die cuts, patterned paper matted with black card and a few embellishents.  I inked around the die cuts with complimentary distress ink to create depth, shadowed the word die with red and adhered the coffee beans with hot glue.


Thanks for visiting today and I hope you have a nice Cuppa later....Coffee, Tea, whatever it may be....
Until next time, Happy Crafting!

Donna

**Challenges Entered:

Monday, September 27, 2021

Noel Christmas Mouse

Hello Crafty Friends and Welcome to Monday, I hope your weekend was enjoyable!  Today begins a new challenge at Pammie's Inky Pinkies and the sponsor this week is Polkadoodles.    

For my team project today, I've created a sweet holiday card using the Noel Christmas Mouse digital stamp from Polkadoodles. 


I've colored the image using my Spectrum Noir Alcohol Markers, the designer papers are from the Carta Bella "Merry Christmas" 6x6 paper pad.  I've die cut the focal panel and sentiment strip, mounted both on craft foam and adhered to the card base.  


For a finishing touch and my "must have" sparkle and shine, I've added blue faux gems.  This is such an adorable Christmas Mouse!  Please join us this week at Pammie's Inky Pinkies, we look forward to seeing your projects.

Until next time, Happy Crafting!

Donna

**Challenges Entered:


Sunday, September 26, 2021

Thanksgiving Gnomes

 Hello Friends!  Today's post features a sweet Gnome couple and a Cheeky Turkey!  I've created a fun Thanksgiving Mini Slimline card using the Kat Scrappiness "Thanksgiving Gnomes" Stamp Set.  This set does have a Coordinating Die Set too.


I've colored the images with Spectrum Noir Alcohol Markers and fussy cut them.  I don't have the coordinating dies but the images are easy to cut out.  Before adhering to the card base, I popped the characters up using craft foam for that bit of dimension.  The papers are from the Echo Park "Celebrate Autumn" 6x6 paper pad.  


Lastly, I've added some translucent gold sequins for shine and called this card finished.  The turkey is my favorite; his expression is priceless....I think he's a bit P.O'd.

Thanks for visiting.  Until next time, Happy Crafting!

Donna

**Challenges Entered:


Thursday, September 23, 2021

Reverse Confetti Autumn Blessings

Hi Friends and Happy Thursday!  Today I'm sharing a card created with the most recent Reverse Confetti and Simon Says Stamp Collab Stamp set - Autumn Blessings.  This was a Stamptember purchase and there are coordinating dies.


I've colored the image with Spectrum Noir Alcohol Markers and die cut with the coordinating die.  The papers are from the Echo Park "Celebrate Autumn" 6x6 paper pad, the polka dot strip is a snippet from my stash.  


I've popped the focal image on craft foam for dimension and stamped the sentiment; which is from the same stamp set, using Catherine Pooler "Icing on the Cake" dark brown ink.  For the finishing touch, I've added golden sequins for that bit of sparkle and shine I love.

A new feature I will share from time to time will be a Manicure of the Day.  I'm an Independent Color Street Stylist and trying to build my business.  In case you're not familiar with Color Street, they are 100% nail polish strips that enable you to have a manicure in minutes.  If you would like to see what Color Street has to offer, click on the Manicure picture and you will be taken to my shop.  If you would like a FREE sample, please fill out the Sample Request Form HERE.  Any questions, I'm delighted to answer!  Thanks in advance for Supporting my small business!


What a Gorgeous Manicure!

Thanks for stopping by and reading through my post today.  Until next time, Happy Crafting!

Donna

**Challenges Entered:


Wednesday, September 22, 2021

A New Journey with Color Street

Hello Friends and Happy Wednesday!  I would like to share with you a new adventure I've recently embarked on and it begins like this:

I was recently introduced to Color Street by my niece, who is an Independent Stylist.  What is Color Street you ask? 


I requested a sample so I could see for myself what these were all about.  I was impressed with the application, the strips are so easy to apply.


Now the exciting part; I was so impressed with the strips, I hosted an online Nail Bar Party and became an Independent Stylist with Color Street!  I would like to invite you to join me in my journey by joining my Facebook VIP Group:  Dynamic Nails by Donna.  This is a Private Group where I share information and showcase the newest products.  The VIP Group IS NOT all about selling...we have fun, we fellowhip, play games and have Girl's Night In's.  


This product is truly a game changer and I'm so excited to be a part of it.  When I retired from working outside the home, I stopped getting Salon Gel Nails; didn't need the extra expense.  I've never been good at polishing my own nails; I'm too impatient waiting for the polish to dry and I would struggle using my non-dominate hand.  You can literally apply the strips and go about your day, not to mention they are so affordable; $11-14 for 16 strips that, depending on the length of your nails, you could possible turn into 32 strips (by using 1 strip for 2 nails).

If you would like a Sample, I am happy to send you a 2 Strip Sample to try.  You'll be amazed at the technology and I believe in "Seeing is Believing".  I have created a Sample Request Form HERE.  Fill it out and I will gladly pop your Sample in the Post!

If you would like to see the current catalog of Products, please visit my shopping link HERE. Color Street Always offers a B3G1!  

Thanks for sticking with me today while I introduce you to my new Color Street Journey.  Let me know in the Comments if you're familiar with Color Street and of not, let me know what you think of this Easy Home Manicure application.  Also, if you have any questions, please ask, I would love to hear from you.

I appreciate your support!  Until Next time, Happy Crafting and Many Happy Manicures!

Donna


Tuesday, September 21, 2021

Guest Designing with the Outlawz Color Challenge

Hello Friends and Happy Tuesday!  I've been invited to guest design with the Outlawz for their Color Challenge.  This challenge runs 2 weeks and the theme includes the colors Blue, White and Green along with something that begins with the letter "S"


For my project, I created a Christmas Card using the required colors and included a stamped snowflake for the "S" requirement.


Using the Gina K. Designs Sparkle and Shine Stamp Set, I stamped and heat embossed the Snowflake and sentiment.  I created a striped background using Green Glitter card scraps and adhering to a card panel with liquid adhesive.  


I backed the focal image with a snippet of Blue Glitter card and popped up with craft foam before adhering to the card front.  For a bit of interest, I round 2 corners of the focal and mat.

Thanks for stopping by and I hope to see you on the Outlawz Color Challenge.  Until next time, Happy Crafting!

Donna

**Challenges Entered:
As You Like It - Prefer Straight Lines but sometimes I mix things up

Monday, September 20, 2021

Inspiration Station Challenge #14 - Bicyling Around the Kitty

Hello Crafty Friends and Welcome to Monday!  Today begins a new challenge at The Inspiration Station and the inspiration photo is a lovely scene:


For my design team project, I colored a digital image from the Angie Blom Enjoy the Ride set to create a scene much like the inspiration photo sans kitty.


Using Prismacolor Pencils, I've colored the scene in a limited color palette.  The sentiment is included in the set and was added to the image prior to printing.


No bells and whistles have been added as I wanted to keep the card as Sweet and Simple as possible.

Please join us at The Inspiration Station, the challenge runs through 03 October and we would love to see how the photo inspires you.

Until next time, Happy Crafting!

Donna

**Challenges Entered:
Corrosive Challenge

Thursday, September 16, 2021

From the Rose Bush

Hello Friends and Welcome to Thursday!  Today I'm sharing a card featuring beautiful roses and an interesting die cut background.

I was fortunate enough to get my hands on the Altenew Collaboration Set with Simon Says Stamp for the Stamptember Event.  The set is titled From the Rose Bush, it's a layering stamp set with coordinating dies and the blooms are gorgeous!


To create my card, I die cut a cover panel using an older die from Cheery Lynn Designs; I believe their products are still availble online.  I stamped the blooms using Catherine Pooler inks in shades of reds, greens and grays.  After the stamping was complete, I die cut the pieces using the coordinating dies and did a dry run arrangement of the cuts.


Once I was pleased with the arrangement, I picked everything up with Press and Seal plastic wrap and adhered to the card front.  I popped up the bloom in front and added clear sequins for shine.

I almost turned this card into a Christmas Card, the Red Roses and Green Leaves would have made a lovely holiday card.  I may do that soon.

Thanks for visiting me today!  Until next time, Happy Crafting!

Donna

**Challenges Entered:


Wednesday, September 15, 2021

Spellbinders Hex Tile Stamps

Hello Crafty Friends and Welcome Back!  Today is a short post featuring a card ceated using the Spellbinders Clear Stamp of the Month for August 2021 titled Hex Tile Stamps.


I've kept the design simple and let the patterned paper do most of the work.  This is a layering stamp set and I've stamped the image using Catherine Pooler Inks.  The DSP is from the Carta Bella "Fall Market" 6x6 paper pad along with the Tag cut-away.


I thought it would be fun to create a little pocket and stamp the sentiment on a tag.  The tag can then be used for a gift if desired.  I've added faux pearls from the Kat Scrappiness Fire Flame Pearl Mix and added a piece of twine to the tag. 

That's all for today!  Until next time, Happy Crafting!

Donna

**Challenges Entered:


Monday, September 13, 2021

Lil Punkin' - Pammie's Inky Pinkies Challenge

 Hello Friends and Happy Monday!  I hope you had a great weekend and your week is off to a great start. Today begins a new challenge at Pammie's Inky Pinkies and the prize this week is a $5 Gift Voucher to Mo's Digital Pencil.

For my design team project, I colored up this adorable little Punkin' from Mo's Digital Pencil using my Spectrum Noir Alcohol Markers.


I adore the art by Mo Manning and there are so many wonderful images in the shop.  I couldn't resist using this image for an Autumn themed card.  The designer papers are from the Carta Bella "Hello Fall" and Bo Bunny "Very Vintage Double Dot Designs" 6x6 paper pads. 
 

I die cut the focal panel with a scalloped oval die from Dies R Us and mounted on craft foam before adhering to the card base.  The sentiment is from the Gina K. Designs "Haunts and Harvest" Stamp Set, the flag banner is a die from My Favorite Things.  For the finishing touches, I've added a strip of ribbon and sequins for additional interest.

Please join us this week at Pammie's Inky Pinkies for the Anything Goes Challenge.  We would love to see your designs and hope to inspire you with ours.

Until next time, Happy Crafting!

Donna

**Challenges Entered:


Sunday, September 12, 2021

You Are Next Level Amazing

Hello and Happy Sunday!  It's a rainy day here in Florida, as it's been all Summer.  I hope the sun is shining where you are.

Today I'm sharing a card created with the Pink Fresh Studios/Simon Says Stamp Stamptember Collaboration Stamp Set titled You Are Next Level Amazing.  Last year, I missed out on every single Stamptember daily offering because I was too late.  This year, I've made it a point to check every day.


This is a lovely set with a sketchy floral bundle.  I embossed a background panel with a Cricut Square Embossing folder and watercolored the image using Arteza Real Brush Markers.  


The coordinating die was a free gift with purchase; I love when there are coordinating dies and when they're Free..that's even better.  I popped the die cut on craft foam and adhered to the embossed panel.  The sentiment is part of this set and I used a saw tooth border die to cut the sentiment strip.

Lastly, various sized sequins were added for a bit of sparkle.  Thanks for stopping by today and until next time, Happy Crafting!

Donna

**Challenges Entered:


Friday, September 10, 2021

Wild Rose Slimline Card

Hello Friends and Happy Friday!  I hope you have plans for something fun and/or relaxing this weekend.  For me, nothing too exciting planned other than a bit of crafty time for me!

My card today features the new monthly Altenew Build-A-Flower for September, the Wild Rose Layering Stamp and Coordinating Die Set.  I've used a non-traditional floral color and a slimline profile.


Using Catherine Pooler browns, oranges and greens inks, I stamp layered the roses and leaves, die cut and set aside.  I wanted a bit of interest in the backgound, so I stamped the outline images in a light shade of brown, die cut the panel with the Cross Stitched Slinline Nesting Dies from Kat Scrappiness and matted with brown card.


I laid out the arrangement and once I was pleased with the look, I used Press and Seal plastic wrap to pick it up.  I adhered the arragement to the focal panel and popped up the front bloom on craft foam.  Lastly, added some extra die cuts in shades of orange and yellow along with gold sequins.  The card base is Neehan 100 lb. Desert Storm Kraft Card.

Have a wonderful weekend and until next time, Happy Crafting!

Donna

**Challenges Entered:


Wednesday, September 8, 2021

White Swan Echinacea

Hello Crafty Friends!  Today's card is a Sweet and Simple card with an Autumn theme using the new Paint-A-Flower for September from Altenew.  It's the White Swan Echinacea Outline Stamp Set.


For the Autumn theme, I thought yellow and orange would be a good color choice.  I started by heat embossing the image with fine detail gold power onto Canson Watercolor paper.  This gives the card some shine without adding other sparkly bells and whistles.

I then used my Gansai Tambi watercolors to paint the floral image and add a yellow background.  To used a piece of kitchen paper towel to blot some of the background, which have it some texture.


I matted the focal panel with brown card, splattered with Gansai Tambi Metallic Gold watercolor paint and adhered all to a cardbase of Neenah Solar White 110 lb. cardstock.

It's a sweet and simple design and a quick make.  Until next time, Happy Crafting!

Donna

**Challenges Entered:


Monday, September 6, 2021

Inspiration Station Challenge #13 - Autumn Scenery

Hello and Happy Monday Friends!  Today begins a new fortnightly challenge at The Inspiration Station and the photo prompt this round is:


Wow, this is a gorgeous picture and could be intrepreted in so many ways!  Autumn, Travel, Trees, Leaves, Outdoors, etc.  I had so many ideas in my head when thinking of what to create for my design team project.  I decided to create an Autumn themed card with silhouette stamps.


I masked an area in the center of the card that, to me, appears to the the "road" in the photo and ink blended Catherine Pooler Inks along the sides.  After allowing the panel to dry completely, I stamped tree silhouette images from the Gina K. Designs Natural Silhouettes Stamp Set using Catherine Pooler Inks in shades of brown. 


Before adhering the focal panel to a brown mat, I die cut with a stitched rectangle nesting die from Kat Scrappiness and splattered with Gansai Tambi Metallic Gold Watercolor paint.  Lastly, twine and gold gems were added.

Please join us this round at The Inspiration Station.  We would love to see how you intrepret the inspiration photo.  Until next time, Happy Crafting!

Donna

**Challenges Entered:


Sunday, September 5, 2021

Creepy Crawlies and Boo-gy Ghosts

Hi Crafty Friends!  Today I'm sharing a Spooktacular Halloween card featuring new products from the Kat Scrappiness September 2021 Release.

Before I get to my card, I want to announce that I 've been offered a Permanent Designer Position with the Kat Scrappiness Team and have gladly accepted.  I enjoyed Guest Designing and it's an honor to be part of such a great team! Now without furthur ado......

My card is A2 in size and features the new release products Creepy Crawly Die SetBoo-gy Ghost Die SetHappy Halloween Word Die with ShadowBoo To You Slimline Paper Pack and the Boo-Tacular Sequin Mix.


I'm in seasonal crafting mode and this card was fun to design.  I love Autumn and Christmas crafting time and enjoy creating cute Halloween cards.  This card was a quick and easy make as the focal images are die cuts and I used my healthy scrap stash for them.  


I love the brightly colored papers in the Boo to You Slimline Paper Pack.  Although, the paper is slimline sized, you can easily for A2 sized projects.  I couldn't resist using Googly Eyes, the BOO-TACULAR Sequin Mix and Wink of Stella on the Word Die for lots of sparkle and shine.  What's more Spooktacular than a Spider with Googly Eyes and a Smiling Ghost?

Stop by the Kat Scrappiness Store for the Labor Day Sale valid 9/3 - 9/6/2021.  Save 15% Site Wide, including new release items!


Until next time, Happy Crafting!

Donna

**Challenges Entered:


Saturday, September 4, 2021

Happy Birthday Florals

Hello Friends!  Today's card features a lovely floral image used to create a birthday card for my stash.  You can never have too many cards on hand and I try to keep my stash well stocked.

This is a Free image from Jane's Doodles and can be found on her blog here. If you're not familiar with Jane's Doodles, check out the shop here.


I've colored the image with Spectrum Noir Alcohol Markers and created a background by stenciling over green card with a darker shade of green ink, then splattered with white and black acrylic gloss spray.


The focal panel has been mounted on craft foam and lastly, Peach Gems from Kat Scrappiness were added for added dimension and interest.  

Thanks for visiting and until next time, Happy Crafting!

Donna

**Challenges Entered:


Friday, September 3, 2021

Colour Crazy Challenge with Star Jam Lines

Hello Crafty Friends and Happy Friday!  Today begins a new challenge at The Colour Crazy Challenge and our sponsor for this round is Star Jam Lines.  

For my design team project, I colored up this adorable Flying Gnome with Ballon digital stamp using my Spectrum Noir Alcohol Markers.


This image isn't necessarily a Holiday Image but I created a Christmas Card with it.  The set includes an image with Nordic Patterned hat or plain hat and I chose to work with the plain hat.  I also printed out an extra balloon.

The papers are from a very old American Crafts Holiday 6x6 paper pad, which I only have snippets left.  I die cut and embossed a circle with a Clouds folder from Darice and hilighted with blue ink to bring out the clouds.  I also die cut the cross-stitched heart and the chevron paper mat and fussy cut Mr. Gnome.  The sentiment is from yet another older set from Stampendous; Christmas Visions.  Lastly, I've added Silver Rhinestone embellishements from Kat Scrappiness.  


Please join us at The Colour Crazy Challenge for your chance to win some cute images from Star Jam Lines.  Until next time, Happy Crafting!

Donna

**Challenges Entered: