Saturday, December 24, 2022

Countdown to Christmas #7 - Merry Christmas Eve

Hello Crafty Friends!  Today is another Countdown to Christmas card; an easy to create card that could be massed produced.  All you need is a die cut shape and colored card.


To start, I've ink blended a background with shades of pink distress oxide inks.  After the panel was completely dry, I heat embossed a sentiment and splattered the panel with white acrylic Gloss ink.  


I've die cut a Christmas Tree from white card, adhered to the panel and highlighted the tree with Crystal Stickles.  I backed the panel with a silver mirror card mat and adhered to the card base.  That's it, so easy peasy.

I would like to wish you and yours a very Merry Christmas Eve. For us tonight, the pan is homemade Lasagne, Christmas Eve service at church, hot cocoa and a drive around town looking at Christmas Lights.  Have a blessed Christmas Eve.

Until next time, Happy Crafting!

Donna

Stop by the Creative Fingers Challenge and enter for a chance to win some blog candy!

**Challenges Entered:


Thursday, December 22, 2022

Altenew: A Year In Review: Crafters’ Edition Blog Hop #2 + Giveaway


Hello Crafty Friends!  I'm thrilled to be a stop along the Altenew " A Year in Review: Crafters' Edition Blog Hop #2" this year!  This Hop contains some gorgeous inspiration and it's been a pleasure creating with some of my favorite Altenew projects in 2022.  So let's see what a few of my favorite projects were this year!


Card #1: Using the "Blooming Through the Seasons" 3-D embossing folder, which was part of the Seasonal Blooms Craft Your Life Project Kit, I created an easy card that packs a punch!  After the panel was embossed, I blended white pigment ink over top and splattered with white ink.  


Card #2: 
I love Blue and Yellow together and this card turned out better than expected.  Using the "Greenwood Flowers 3 in 1 Layering Stencil Set" I ink blended gorgeous shades of blues, greens and yellows.  The florals and leaves are large so they were easy to fussy cut too.  The background panel was embossed with the Altenew "Row of Squares" 3-D Embossing folder and belnded over with yellow ink.


Card #3:  This larger than life floral is part of the "Feathered Lilies Craft Your Life Project Kit".  My card meaures 5x7" so you see the scale of this gorgeous lily.  To create this effect, I stamped the image on the cardbase and again on a large Altenew "Nesting Slim Label Die", only coloring the stamped image on the die cut.  Popping the die cut on craft foam, the dimension along with the color make it a unique design.


Card #4: Altenew has the prettiest (and easiest to use) 3-D layering Die Sets.  This is the Craft-A-Flower Peruvian Layering Lily and I gave it sparkle by cutting 2 of the layers from white and gold glitter card.  Only 4 layers are required for this floral and it's a stunner!


Card #5: Christmas is almost upon us so I must share this quick and easy holiday card using the Altenew Festive Silhouettes Stamp Set. I blended a card panel with shades of green inks, heat embossed the image and sentiment with fine detail gold embossing powder and splattered with gold paint.  I matted the panel with gold mirro card to give it that extra holiday sparkle and shine.  This would be a great card to mass produce.


Now for the Giveaway details and Hop Line-up!


Prizes:

Over $500 in total prizes! Altenew is giving away a $100 gift card to 1 lucky winner, 3 $50 gift cards, and 27 $10 gift cards. Winners will be chosen from both blog hop #1 and blog hop #2. Please leave a comment on the Altenew Card Blog HERE by 12/28/2022 for a chance to win. 

(Feel free to share your favorite projects using #Altenew and #AltenewBest2022 when you share blog hop projects on social media. Don’t forget to tag Altenew!)

Wait, there's MORE!

We would also LOVE to see YOUR favorite handmade cards, layouts, home decor, etc. featuring Altenew products! Feel free to share them on social media or on your blog using the hashtag #AltenewBest2022. You may also add a link by clicking the blue button below.

FOUR lucky crafters will each win a $15 gift certificate to our store! Winners will be announced on the Altenew Winners Page on 12/30/2022. We are looking forward to seeing your beautiful creations!


Blog Hop Order:

Altenew Card Blog

Emily Midgett

Penny Pynnonen

Therese Calvird

Helen Kalb

Nandini Karmarkar

Pam Boedeker

Teri Wilson

Shylaashree

Virginia Lu

Donna Walls  ----- You Are Here!

SathyaKala Sankaran

Ishani

Amy Hill

Angela Brennan


Thanks for visiting today!  Wishing you and yours Happy Holidays and until next time, Happy Crafting!

Donna


Monday, December 19, 2022

Pammie's Inky Pinkies Challenge - Bella Bear Daisy

Hello Friends!  I'm back with a project for the newest Pammie's Inky Pinkies Challenge, which starts today.  Our generous sponsor this round is Polkadoodles and I've used the Bella Bear Daisy digital stamp.


I will be sending out Thank You's in January and thought this sweet image was perfect for a card.  It's also a change of pace from the Holiday mode I've been in.  I've colored the image using Spectrum Noir Illustrator Alcohol Markers. For everyone in the United States North and the Northern Hemisphere Overseas, I hope the Spring feels of this card warm you up.


The patterned papers are from a Polkadoodles digital paper pack, the sentiment die is from Waffle Flower.  Lastly, I've added silver sequins rom my stash.  Please join us at Pammie's this week for an opportunity to win a gift voucher from Polkadoodles.

Here's an exciting announcement:  A new monthly challenge will be starting soon!  It's the Beautiful Blossoms Challenge and the theme will always be Anything Goes Flowers/Florals.  Challenges will start on the 15th of each month and run until the 12th of the following month.  Check it out here:  https://beautifulblossomschallenge.blogspot.com/

Until next time, Happy Crafting!

Donna

**Challenges Entered:
We Love Stamping - I love bright colors, cute images, adult coloring, flowers and warm weather!

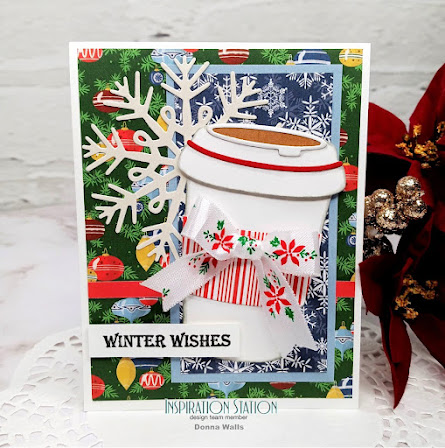
Inspiration Station Challenge #44 - Cup of Cheer

Hello Crafty Friends and Happy Monday!  The holiday rush is on and I have some last minute shopping, wrapping and baking to do this week...how about you?  In the meantime, a new bi-weekly challenge round has started at The Inspiration Challenge Blog.  The photo prompt is just too stinkin' adorable!


For my team project, I was inspired by the Hot Beverage and one of our Christmas Eve traditions.  After Church Service, we go to Starbucks for a Hot Cocoa and then drive around looking at Christmas lights while playing Holiday music.


This "to-go" cup die is from Kat Scrappiness and the papers are from the Carta Bella "Merry Christmas" 6x6 paper pad.  The ribbon is from my stash and the snowflake was received in a card swap.  The sentiment is from an older Gina K. Designs Stamp Set.  


We would love to have you join us at The Inspiration Station this round.  Next month, starting January 2nd, the challenge will go to a Monthly format.  The challenges will start on the 1st Monday of the month and end on the 25th of the month.

1 More more thing......I would like to announce a new monthly challenge will be starting soon!  It's the Beautiful Blossoms Challenge and the theme will always be Anything Goes Flowers/Florals.  Challenges will start on the 15th of each month and run until the 12th of the following month.  Check it out here:  https://beautifulblossomschallenge.blogspot.com/

Until next time, Happy Crafting!

Donna

**Challenges Entered:


Saturday, December 17, 2022

Countdown to Christmas #6 - Gifts

Hello Crafty Friends and Happy Saturday!  I'm back with Card # 6 in my Countdown to Christmas Series, where I'm focusing on quick and easy cards that can be massed produced.

For this card, all that you need are 3 snippets of patterned paper and a bit of ribbon to create a stack of Christmas Gifts.


To start, I've embossed a panel with a snowflake embossing folder.  I have only scrap pieces left from the Carta Bella Christmas Market 6x6 paper pad so I cut 3 squares of varying sizes.  I cut thin strips to act as "lids" for the boxes (this is apparent on the bottom gift).  


I have loads of Christmas ribbon in my stash so I trimmed a piece and adhered flat, then tied a bow and adhered with a glue dot.  TIP:  I like to use Fray Check on the ends of ribbon.  This keeps it from fraying.

I had a few pieces of ephemera left from the collection so I added a banner tag.  After adhering the panel to the card base, I spritzed it with Shimmer Spray for lots of sparkly goodness.

I thought the sentiment was such a great match to the card theme.  The sentiment is from the Memory Box Yuletide Moments Stamp Set.


That's all I have for today.  Make a mental note of this design for next year, however this would also be a great Birthday card design too!  Until next time, Happy Crafting!

Donna

**Challenges Entered:
A Place to Start


Friday, December 16, 2022

Countdown to Christmas #5 - Delicate Snowflakes

**Before I get to my share for today, I wanted to announce a new challenge blog will be starting up the 15th of January 2023.  It's a monthly challenge, starting on the 15th of each month and the MAIN focus will be Florals/Flowers.  It's the Beautiful Blossoms Challenge and there is a DT Call going on now.  If interested in joining the team, the contact info can be found on the Blog:   https://beautifulblossomschallenge.blogspot.com/

Now, for today: 

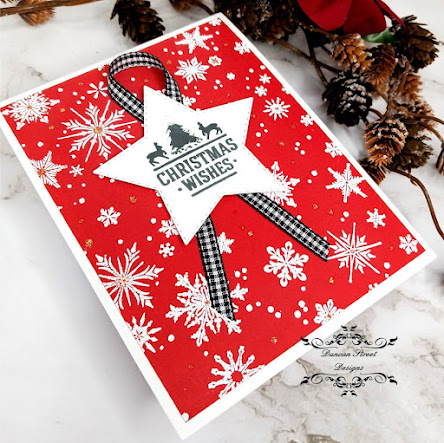
Hello and Happy Friday!  Today's card #5 in my series of Countdown to Christmas is a bit more involved but still an easy card to create, which could be massed produced using a stamp positioner tool (I use a Misti).


To start, I've heat embossed a red panel using the Gina K. Designs "Delicate Snowflakes" background stamp and Simon Says Stamp Sparkle White Embossing powder.  By leaving the background stamp in your stamp positioner tool, you can easily add different colored panels of card and stamp away, then heat emboss in one swoop.


In an earlier crafting session, I die cut several stars and put them aside.  I stamped the sentiment, which is from an older Gina K. set (don't have the original packaging), using a dark gray ink.  I took a bit of checked plaid ribbon to place behind the star, which I popped on craft foam.  

Lastly, I've added a bit of Fake Dimensional "Snow" to the tree and dotted the panel with Gold Stickles.  That completes this card, not difficult and I have embossed panels of blue and purple waiting in the wings.

Until next time, Happy Crafting!
Donna

**Challenges Entered:


Wednesday, December 14, 2022

Countdown to Christmas 3 - Scrappy Trees

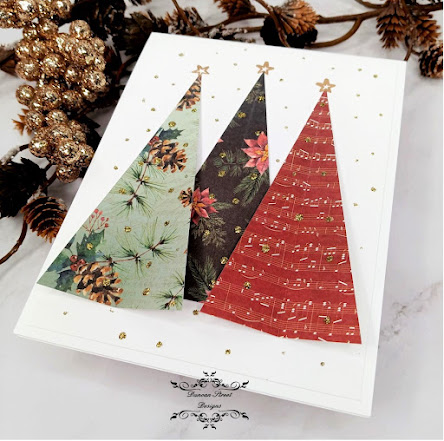
Hello Crafty Friends and Happy Wednesday!  The Big Day will be here soon and today I'm sharing another card that uses scraps of patterned paper and a simple geometric shape.  This card could be easily created and mass produced.


All you need for this card are 3 scraps of patterned paper that measure 2" x 4".  Your snippets could be bigger and you could use more, depending on the size of your card.  My card measures the standard US 4.25" x 5.5".  

Fold your scraps in half and trim from one corner to the next, at an angle to create a Triangle.  Unfold and viola!  You have a Tree. 


To create dimension on your card, apply liquid adhesive on the middle fold and place on your card base or panel; in my case, I've adhered to a 4" x 5.25" panel.  Because the adhesive is only on the middle fold, the sides of the trees and be lifted.

Because no self respecting Christmas Card of mine would be complete without a bit of bling, I've heat embossed tiny stars at the tree tops and added dabs of Gold Stickles to mimic snowfall.  This card design would also look lovely in Winter Blues for a wintery card, so it's versatile too.  

I did not want to take away from the trees so I've opted to stamp my Christmas sentiment inside.  That's all it takes, some pretty snippets of paper that I know you have tucked away in your craft space. 

Thanks for visiting and until next time, Happy Crafting!

Donna

**Challenges Entered:


Monday, December 12, 2022

Countdown to Christmas 2 - Plaid Baubles

Hello and Happy Monday!  Today I'm sharing another quick and easy card, one that would be easily massed produced.  All you need is patterned paper, a circle die and some string or ribbon.


Using scraps of patterned paper from the Memory Box "Christmas Plaids" 6x6 paper pad, nesting circle dies and gold thread, I've created an abstract Christmas Card.  I thought the circles could be hanging baubles.


The sentiment is from a magazine Freebie and has been heat embossed using fine detail gold embossing powder.  The gold gems are from Kat Scrappiness.  Each circle die cut has been popped on craft foam for dimension.  This is a good way to use up those scraps...I don't know about you but I cannot part with even a scrap of patterned paper and I need to use them some how.

That's all for today.  Until next time, Happy Crafting!

Donna

**Challenges Entered:


Saturday, December 10, 2022

Prismatic Snowflakes

Happy Saturday Crafty Friends!  I have a quick share for you today, featuring some heat embossing and ink blending.


To start the panel, I've ink blended Prize Ribbon and Salty Ocean Distress Oxide Inks and let thoroughy dry.  The Simon Says Stamp Stemptember Set "Prismatic Snowflakes" and sentiment have been heat embossed with White Sparkle embossing power, also by Simon Says Stamp.  The sentiment is from the Memory Box "Yuletide Moments" Sentiment Set.  


Before mounting the panel on Silver Mirror card, I splattered with white acrylic paint, for the snowy effect.  I got a little heavy handed with some of the splatters, but I guess we can call that "artistic expression".   TIP:  before splattering with white paint or ink, make certain the blended panel is completely dry, otherwise the white splatters will take on the color underneath.

Lastly, I popped the matted panel on craft foam, adhered to the card base and spritzed the card with Shimmer Spray.  You'll have to trust me when I say, between the White Sparkle Embossing Power and the Shimmer Spray, this card has the WOW factor...very sparkly, wintery, shimmery and festive.

That's all I have for today.  I wish you a great weekend and until next time, Happy Crafting!

Donna

**Challenges Entered: