Thursday, July 29, 2021

Krafty Chicks Challenge - Anything Goes

Hello Friends and Welcome!  Today, I'm sharing my last Guest Designer project for the challenge at The Krafty Chicks Challenge Blog.  The theme this week is Anything Goes and I've had a wonderful time this month creating for the challenges.  This month has flown by and I am so thankful the Chicks invited me to join them this month.  

My project today features the lovely Gina K. Design Stamp and Coordinating Die Set Beautiful Wings, which has been illustrated by the super talented Melanie Muenchinger. This card meaures 4.5" square so you can see the dragonfly is quite large.


Using the Diagonal Stitched Square Dies from Pink Fresh Studio, I've cut panels using patterned paper from the Bo Bunny Garden Party 6x6 paper pad.  This card is quite dimensional as I've added craft foam to the top and middle panel.  


I've stamped and colored the Dragonfly using Prismacolor Pencils and cut with the coordinating die.  I also die cut the dragonfly from vellum, placed behind the colored image and adhered all to the top panel with foam pads. The sentiment is from the same set and to finish, I added clear gems and Wink of Stella to the Dragonfly Wings.

I've had a great time as Guest Designer and I invite you to stop by the Krafty Chicks Challenge.  Enter your Anything Goes project, we would love to see what you create!

Until next time, Happy Crafting!

Donna

**Challenges Entered:


Tuesday, July 27, 2021

Altenew Academy AECP Level 1 Course: Celebration Stencil Techniques

Hello Crafty Friends!  Today's post centers on my course submission to the Altenew Educator Certification Program Course: Celebration: Stencil Techniques taught by Laurel Beard.  With the trend of stenciling being so popular at the minute, this course taught techniques and tips for using your stencils in creative ways and stretching your stencil stash.

My design features a technique that may be familar, inking through a stencil, which I've done here creating a rainbow background.  I've used the Altenew Confetti Stencil to ink blend on Neenah Solar White 80 lb. white card. 


Naturally, no card of mine would be complete without some sort of sparkle and shine, so while the ink was still wet and the stencil in place, I applied Cosmic Shimmer Glitter Gel and allowed to dry thoroughly.


The glitter gel is semi-transparent when dry but also picks up the ink during the drying process, tinting the gel, which allows the colors to show through perfectly.

I die cut a delicate sentiment, stacking 2 dies for a bit of sturdiness and heat embossed a strip, popping the strip on craft foam for dimension.  Lastly, I matted the focal panel and adhered to a card base of Neenah Solar White 110 lb. card.


The glitter gel is very sparkly and dimensional when dry.  This was a great course for expanding knowledge on different stenciling techniques.  I have more to try and will be showcasing them in the near future.

Thanks for stopping by today!  Until next time, Happy Crafting!

Donna

**Challenges Entered:


Sunday, July 25, 2021

Miss You Flowers - Angie Blom

Hello!  Today I'm sharing a card made using the Miss You Flowers Digital Stamp and Sentiment Set from Angie Blom Digital Designs.  This is a gorgeous digi stamp which is an easy color and very versatile; the bouquet can be colored for any time of the year / season.  It would look wonderful in Autumn Colors!


I've colored the image with Spectrum Noir Alcohol Markers, the sentiment is included in the set along with 2 other sentiments.  I've added splatters of Black Acrylic Paint, White Acrylic Gloss Spray and sequins.  The card base is Neenah Solar White Classic Crest 110 lb card.


Thanks for visiting me today, take care and until next time, Happy Crafting!

Donna

**Challenges Entered:

Saturday, July 24, 2021

Watercolor Bouquet Slimline

Good Day Friends!  Today I'm sharing a slimline card created using the Altenew Watercolor Bouquet Layering Stencil.


This is a 2 layer stencil that is quite large as you can see by the image, which is on a standard sized slimline card base.  I've blended Altenew inks to create the 2 tones of Aqua Blue and used snippets of Bo Bunny patterned paper to accent.  For a bit of shine, I splattered Gansi Tambi Starry Metallic Watercolors in Gold. 


The die cut and stamped sentiment are from Gina K. Designs.  I've adhered the die cut flat and popped up the strip on craft foam.  The right corners have been rounded for a different look.

Thanks for stopping by.  Until next time, Happy Crafting!

Donna

**Challenges Entered:

Friday, July 23, 2021

Altenew Academy AECP Course: Let It Shine

Hello Friends!  Today I'm sharing 2 projects created for the Altenew Educator Certification Program Course "Let It Shine".  This course teaches tip and tricks for adding sparkle and shine to your projects.  If you know me, you know I LOVE sparkle...it's kinda my thing, so this course was made for me!

My 1st project features the Altenew Way Too Sweet Stamp Set, Alcohol Marker coloring, Patterned Paper and Glitter.

Adding loose glitter to a project is one of the many ways od adding sparkle and shine to a project.  I know loose glitter can be messy but in this instance, it wasn't at all.  I used very little loose glitter and that enabled me to control it.  

I started by coloring the images with alcohol markers and fussy cutting them.  Using a Sakura Quickie Glue Pen, I added liquid adhesive to the areas I wanted to add the glitter.  Using a Multi-colord glitter from Hobby Lobby and Fun Stampers Journey Sparkle Cuts, I adhered a small bit to the images.  To make certain all was adhered, I rubbed over the glitter with a piece of scrap paper, then set aside to dry.


Once dry, I created my layout using strips of patterned paper, black card and craft foam.  I love how sparkly the sweets are; the glitter makes them POP.

My 2nd project uses 3 different techniques of adding sparkle and shine; Heat Embossing, Glitter Tape and Glitter Gel.  


To start, I stamped and heat embossed the large floral bunch from the Altenew Dearest Friend
stamp set onto watercolor paper using fine detail gold embossing powder.  With Arteza Real Brush Markers, I watercolored the image and die cut with the coordinating die.  

To create my background, I cut two pieces of patterned paper from the Altenew Wildflower 6x6 paper pad and adhered to the card base with liquid adhesive.  I remembered I have glitter tape from Cricut, that I've had for ages, so I adhered a strip to separate the two patterned papers.


I stamped and heat embossed the sentiment; which is from the same stamp set directly to the card panel and mounted the focal image using craft foam.  Lastly, I added Stickles Glitter Gel to the edges of the florals and that completed this card.

With the heat embossing, glitter tape and glitter gel, this card is very sparkly but not overdone.  This was a great course, I picked up tips on techniques I already use and learned new techniques that I will be using on future projects.  

Thanks for visiting today.  I hope you'll try some of the techniques I've shared and comment below what techniques you use to add sparkle and shine to your projects.

Until next time, Happy Crafting!

Donna

**Challenges Entered:
Way Too Sweet Card:


Thank You Card:


Thursday, July 22, 2021

Krafty Chicks Challenge - Any Occasion

Hello Friends and Welcome!  Today begins a new challenge at the Krafty Chicks Challenge Blog and I'm back with my 3rd Guest Designer project.  The theme this week is Any Occasion and my project today features lovely florals and Ink Smooshing for a Birthday Card.


To start, I ink smooshed a panel of white card with Catherine Pooler Inks.  After allowing the card to dry completely, I stamped blooms from the Altenew Majestic Bouquet Stamp Set with Gina K. Designs Obsidian Amalgam Ink and die cut the florals with the coordinating dies.  

I wanted to keep white space but also wanted texture, so I embossed a panel of Neenah 80 lb. card with a Basketweave pattern and adhered flat to the card base with liquid adhesive.


To finish the card, I arranged the die cuts, popping the front floral on foam pads for dimension.  I stamped the sentiment, both from the Gina K. Designs Enjoyable Greetings Stamp Set and adhered flat to the embossed panel.  Of course I couldn't call this card complete without a bit of sparkle and shine so I added Wink of Stella to the florals.

Thanks for visiting today and please stop by the Krafty Chicks Challenge.  We hope to inspiration you with our designs and hope you'll enter the challenge.

Until next time, Happy Crafting!

Donna

**Challenges Entered:
Simon Says Stamp Wed. Challenge Old is Embossing Folder, New is Floral Stamp

Tuesday, July 20, 2021

Altenew Academy AECP Level 1 - For the Guys

Hello Friends and welcome back.  Today, I'm sharing projects created for the Altenew Academy Level 1 Course "For the Guys".  Creating Masculine cards can be challenging however this course provides tips and techniques for creating cards for those men and boys in your life.

For my first card, I wanted to follow a theme from the course and create a card for a young or tween boy. I realized I seldom create cards for boys so it was time to use class inspiration and create a fun card using the Altenew Ori Kami Stamp Set.


To start, I created my own background on a panel of gray card by stamping the Elephant image using Altenew Charcoal Suit Crisp Dye Ink.  I "second generation stamped" or inked up the image, stamped off on scrap paper once and then onto the card panel, using Altenew Silver Lake Crisp Dye Ink. This creates a faint stamped image.


I stamped the Elephant on Turquoise card using the same Charcoal Suit Crisp Dye Ink and fussy cut the images.  I splattered the panel with White Acrylic Gloss Spray and watered Charcoal Suit ink, backed the focal with purple card and adhered to the card base.  I stamped the sentiment in 2 parts, arranged the design and adhered to the card panel, popping up one Elephant and the sentiment strips on craft foam.  Lastly, added gray enamel dots for additional interest.

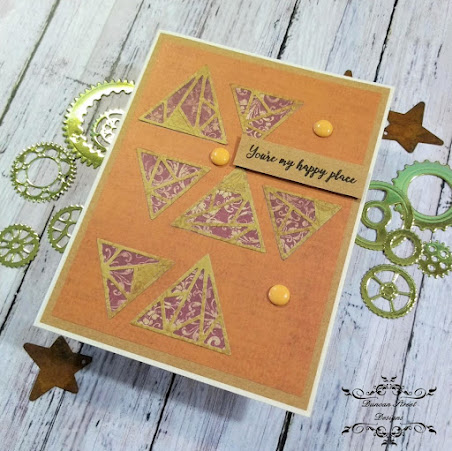
My second card was created using the Altenew Shattered Triangle Die Set.  I die cut 7 triangle bases and tops from patterned paper and adhered together.  For additional interest, I inlaid a few of the waste pieces back into the triangle tops. 


I created a mat of patterned paper, backed with kraft card and adhered all to a card base of cream cardstock.  I arranged the triangles flat to the card panel and stamped the sentiment on a snippet of Kraft card, popping the strip on craft foam before adhering to the focal panel.


Lastly, adding enamel dots to complete this simple yet effective card.  This was a great AECP course.  Masculine cards are hard for me as my thoughts always go to pretty florals but this course provided the inspiration to think outside the box and the confidence to create some fun designs for the guys.

Thanks for visiting and reading through my post today.  Until next time, Happy Crafting!

Donna

Products Used:
Recollections Card Stock and Patterned Papers
Art Glitter Glue Liquid Adhesive
Cardz TV Ticket Talk 2 Stamp Set
Cardz TV Mini Messages Stamp Set
Maymay Made It Sittin' Tree Stamp Set
Fiskars Outline Alpha Stamp Set

**Challenges Entered:
Ori Kami Card:

Shattered Triangles Card:


Monday, July 19, 2021

Pammie's Inky Pinkies with CAS_ual Fridays

Hello Again!  Today begins a new challenge week at Pammie's Inky Pinkies and the sponsor this round is the generous CAS_ual Fridays Stamps.

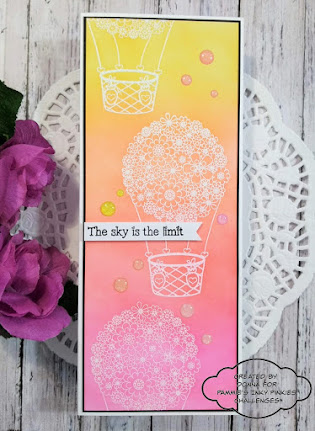
For my design team project, I created a traditional sized slimline card using the "Floating" Stamp Set which is now retired.  The card measures 8.5" x 3.5".


To start, I stamped and heat embossed the Balloon image for an ink resist technique.  I blended Catherine Pooler Inks in the colors of Party Dress, Tiki Torch, Bellini and Limoncello.  Once dried, I rubbed the excess ink sitting on the heat embossing with a Microfiber towel.  


The sentiment is from the same set and stamped with Versafine Onyx Black Ink.  I mounted the sentiment strip on craft foam, matted the focal panel with black card and adhered to a card base of Neenah Classic Crest Solar White 110 lb. cardstock.  Lastly, I added enamel sparkle dots in the same shades as the inks.

Please join us this week at Pammie's Inky Pinkies!  Until next time, Happy Crafting!

Donna

**Challenges Entered:


Inspiration Station Challenge #10 - My Pet Fish

Hello Friends and Happy Monday!  Today begins a new challenge at the Inspiration Station and the inspiration photo is a group of colorful fish.  


When I saw this photo, I knew exactly what I wanted to create for my design team project.  Using the Pet Goldfish stamp set from Hero Arts, I stamped and watercolored 2 goldfish and Seaweed.


I needed to craft a fish bowl so I searched through my dies and found a circle die with a flat bottom.  After die cutting a piece of watercolor card, I trimmed the rounded side and had my fishbowl.  I watercolored the die cut and punched a pile of mini hearts to serve as the rocks.  Once the panel was dry, I stamped and heat embossed the sentiment, fussy cut the images and built up the scene.  The patterned papers are scraps left from a Bo Bunny 12x12 scrapbook pack 


This was a fun project and I enjoyed the creating process.  It was fun to think outside the box and use what I had on hand to create a "fishbowl".  We hope you'll join us for the challenge at the Inspiration Station, we would love to see how the photo inspires you.

Until next time, Happy Crafting!

Donna

**Challenges Entered:


Sunday, July 18, 2021

Sending Floral Wishes

Hello Friends and Happy Sunday!  Today's card features the Spellbinders Sending Floral Wishes, which is the Clear Stamp of the Month for July 2021. 


To start my card, I stamped and colored the florals using Prismacolor Pencils.  I cut along one edge of the bouquet, mounted on craft foam and layered on patterned paper from the Bo Bunny Very Vintage Dots 6x6 paper pad. 


The sentiment was stamped and die cut, mounted on craft room and adhered to the card base.  No bells and whistles this time, only a strand of Baker's Twine.  I called this card complete but it was missing my sparkle and shine so I spritzed with Glimmer Mist; which is not picked up on the photo.

Until next time, Happy Crafting!

Donna

**Challenges Entered:


Friday, July 16, 2021

Altenew Academy AECP - Easy Ink Blending Techniques

Hello Friends and Happy Friday!  I'm back today with 2 projects for the Altenew Academy AECP Course: Easy Ink Blending Techniques.  This course teaches techniques for seamless ink blending with some added twists.  

I used to think ink blending was difficult and when I first tried a few years ago, I was rubbish at it.  I will be honest, the technique take a bit of practice and the right tools for a smooth blend.  Even though ink blending is not new to me, I gained knowledge from this course with techniques I never thought of trying. 

For my first project, I used the "traditional" ink blending technique taught in class.  I masked the center of the card panel and ink blended 4 shaded of blue inks, starting with the darkest on the edges and using lighter shades as I blended inward.  


I allowed the panel to dry completely before removing the mask.  I stamped the Tree and Sentiment, which are from the Altenew Festive Silhouettes Stamp Set, using Black Pigment Ink.  I replaced the mask and splattered the piece with Gloss White Acrylic Spray.  


For this technique, I used blending brushes, which I find give me a smoother blend than the foam pads.  To finish up this card, I matted the focal panel with black card, mounted on craft foam and adhered to a 110 lb. card base.

My next project features ink blending and a bit of water coloring with inks.  This was another technique taught in class that I've never thought of and I'm surprised because it's so obvious and easy to do.


To start, I ink blended on the right bottom half of the card panel using blending brushes and 4 colors of complimentary inks.  I used Canson Mixed Media Paper as I knew I would be using water on the piece.  After the ink dried, I stamped the Altenew Paint-A-Flower Clematis Josephine image over the ink blending.  


Next step was to use darker shades of the inks I used to blend, add water to the areas I wanted to appear darker and add the darker inks to the wet areas.  This technique leaves the ink blending fairly intact and allows for the "watercolor" look with added shading.  Once everything was dry, I splattered the piece with watered down Violet ink and Gloss White Acrylic Spray.

I did not have a snippet of card in the fuchsia/violet color so I ink blended the top and left side of the snippet, adhered the focal panel, matted with black card, mounted on craft foam and adhered to a 110 lb. card base.

To finish, I heat embossed the sentiment, from the same stamp set, on a snippet of black card, mounted on craft foam and adhered to the card base.  Lastly, added sequins for a bit of shine and interest.

I thoroughly enjoyed this course and was very pleased with the finished cards.  Most of all, I liked the idea of taking ordinary ink blending to new heights.  Thanks for visiting and reading through my post today.  I'll be back soon with another AECP project so until next time, Happy Crafting!

Donna

Products Used:
Catherine Pooler Inks
Neenah Classic Crest Solar White Card Stock (110 and 80 lb)
Blending Brushes from Amazon
Ranger Fine Detail White Embossing Powder
Recollections Black Cardstock 80 lb
Sequins - Unbranded

**Challenges Entered:
Holiday Card:


Clematis Josephine Card:


Thursday, July 15, 2021

Krafty Chicks Challenge - Clean & Simple

Hello and Happy Thursday!  I'm back on the Krafty Chicks Challenge Blog with a new Guest Designer project.  The theme this week is Clean and Simple and I couldn't resist using this adorable image from Lee Holland Digital Designs.  It's the Bunny Holding Flower, which I turned into a big Gerber Daisy!


In keeping with the theme of this weeks' challenge, I kept lots of white space and colored the bunny with only shadow and light pink to highlight the ears, nose and tongue.  


For design interest, I've added a Gingham Ribbon and embossed the background panel with a Dandelion Seed Embossing Folder.

Please join the Krafty Chicks Challenge this week, we would love to see your CAS creations!
Until next time, Happy Crafting!

Donna

**Challenges Entered:


Wednesday, July 14, 2021

Flamingo Builder Stencil - Erin Lee Creative

Hello Crafty Friends and Happy Wednesday!  Before I continue with my Card of the Day, I wanted to remind everyone today is the last day of the Christmas in July Blog Hop. The Hop is active until Midnight EST tonight 14 July so hop along for your chance to win some holiday themed prizes.  To find the hop, click HERE and you can also find the post in the sidebar to the right.  Hope to see you there!

My card today features the Erin Lee Creative Flamingo Builder layering Stencil.  Much like my card yesterday, this stencil creates a lovely image and the Tropical theme is very "in" this summer.


I've used Catherine Pooler inks to stencil, stamp and blend this slimline scene.  The layering stencil is very easy to line up and ink through.  After ink blending, stenciling and allowing the ink to dry, I added additional interest with Dina Wakley White Acrylic Gloss Spray splatters.


Lastly, I added my sequins, matted with black card and adhered all on a card base of Neenah Solar White Classic Crest 110 lb card.  I love the Tropical feel of this card and I hope you do as well.
Until next time, Happy Crafting!

Donna

**Challenges Entered:

Tuesday, July 13, 2021

Monstera Layering Stencil

Hello Crafty Friends and Happy Tuesday!  Before I continue with sharing my Card of the Day, I wanted to remind everyone of the Blog Hop that is active until Midnight EST on 14 July so hop along for your chance to win some holiday themed prizes.  To find the hop, click HERE and you can also find the post in the sidebar to the right.  Hope to see you there!


My card today features the Erin Lee Creative Monstera Layering Stencil and the Good Vibes Layering Die.  I love the ease of layering stencils and stencils have come a long way from when I first started papercrafting, producing lovely layered inages.


I used 4 shades of Catherine Pooler green inks to create the background of this slimline card.  The layering stencil is very easy to line up and ink through.  After stenciling and allowing the ink to dry, I added additional interest with Dina Wakley Black and White Acrylic Gloss Spray splatters.


I inked a snippet of card with 2 shades of Pink Catherine Pooler ink to create an Ombre and die cut the sentiment.  I layered on a shadow of Vellum and adhered to the panel.  I didn't have the exact color of enamel dots so I dug out my old skool hand punch for the tiny circles, using glitter card.  

I matted with black card and adhered all on a card base of Neenah Solar White Classic Crest 110 lb card.  I love the Tropical feel of this card and I hope you do as well.

Until next time, Happy Crafting!

Donna

**Challenges Entered:


Monday, July 12, 2021

Sunflower Smiles

Hello Crafty Friends and Happy Monday!  Before I continue with sharing my Card of the Day, I wanted to remind everyone of the Blog Hop that is active until Midnight EST on 14 July so hop along for your chance to win some holiday themed prizes.  To find the hop, click HERE and you can also find the post in the sidebar to the right.  Hope to see you there!


My card today features the Sunflower Smiles digital image by Star Stampz.  I adore Sunflowers in the Summer and Fall.  I used to grow mini sunflowers in whiskey barrell pots, placing them on my front porch.  The minis are adorable, I need to grow some this Fall.


I colored the image with Spectrum Noir Alcohol Markers then trimmed the side with a My Favorite Things Stitched Scallop Basic Edge Die. I created a side panel by inking up a strip of card using Catherine Pooler ink as I didn't have colored card that shade of blue. 


I cut a piece of craft foam slightly smaller that the focal panel and mounted all on a Neenah Solar White Classic Crest 110 lb. card base.  I find myself using craft foam instead of foam tape of foam pads for dimension.  I find it more economical and I can die cut it to match the shape of more intricate die cuts.

The sentiment was sent to me in a card swap and lastly, I added Wink of Stella Clear Sparkle on the Sunflowers and enamel dots for additional interest.

Thanks for stopping by and until next time, Happy Crafting!

Donna

**Challenges Entered:


Sunday, July 11, 2021

Get Your Jingle On!

Hello and Happy Sunday!  In keeping with yesterdays Christmas in July Blog Hop with The Paper Funday and Inspiration Station Challenges, I've created another holiday card. 

The Blog Hop is still active until Midnight EST on 14 July so you have plenty of time to hop along for your chance to win some holiday themed prizes.  To find the hop, click HERE and you can also find the post in the sidebar to the right.  Hope to see you there!

My make and share today features the Polkadoodles Gnometastic Sunny digital image.  I don't own a Gnometastic image specifically for the Holidays so I decorated Sunny up for the Season.


I colored him with Spectrum Noir Alcohol Markers then die cut him with a nesting oval die.  I created panels using papers from Memory Box and layered everything on a card base of Neenah Solar White Classic Crest 110 lb. card.  The sentiment is from a Cardz TV set.


Thanks for stopping by and until next time, Happy Crafting!

Donna

**Challenges Entered: